Bijna alle veranderingen in Cue Print op een rij

Overview of selected changes in NewsGate and CUE Print.
(een samenvatting van alle handleidingen vanaf versie 3.09 naar 3.22)
De tekst is in het Engels, de Google Translate versie naar het Nederlands vind je hier.
Deutche Übersetzung finnt mann hier.
Crashes should not lock items
Multiple logins, caused by crashes, double logins, or other scenarios caused users to be blocked via ‘locks’ made by themselves.
Improvements have been made to avoid double logins, i.e. it is only possible to login once per Workstation per fit client. But it is still possible to login to both a Fit and a Fat client on the same Workstation.
Secure Workstation logout/shutdown has also been implemented by the use of login sessions maintained in the CCI Database, to be able to identify lock holders of blocked applications.
Detailed log messages and prompts will be displayed with information on lock holder: either yourself, ‘your initials’ (in another session) or just initials of the other user.
(na de Oracle database update van komende week)
Navigation pane NewsAccess
From version 3.10.1, a general change has been made to the CCI NewsAccess Navigation panes and product pickers, so that products now, per default, are listed above dates in the navigation tree.
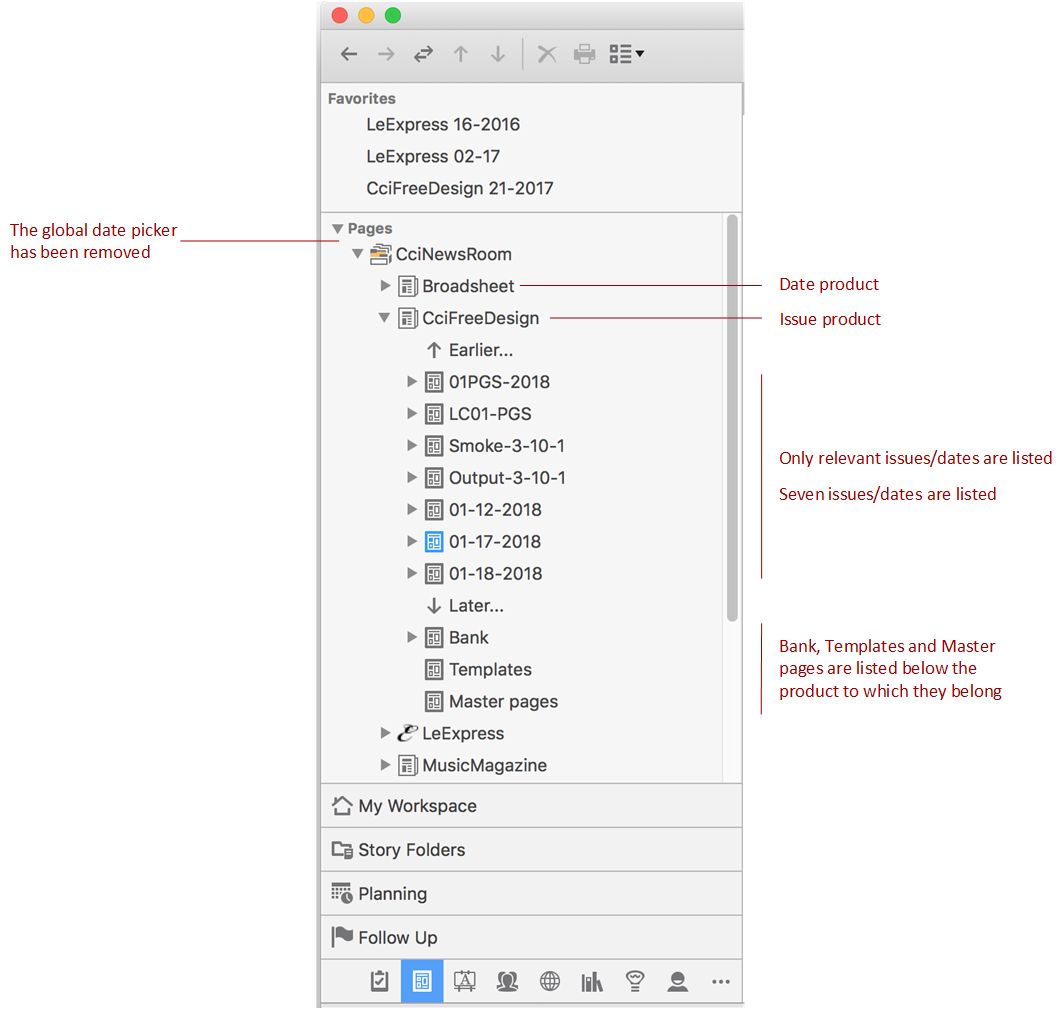
If you want to keep listing dates over products, the hierarchical structure of products and dates in the Navigation panes and in product pickers is, from version 3.10.1, controlled by a new “Show Products above Dates” option in the Navigation tab in the Preferences dialog.
2.1 User Interface Changes
Changes to the “New Story Folder” Dialog
From version CUE Print 3.18.0, the New Story Folder dialog has undergone the following changes:
- The Production tab has been renamed to Packages
- A new Assignments tab has been added to the New Story Folder dialog.The “Packages” tabFrom version CUE Print 3.18.0, the Production tab has been renamed to Packages, and it now only holds packaging-related information.
Also, the assignment options have been moved to the new Assignments tab.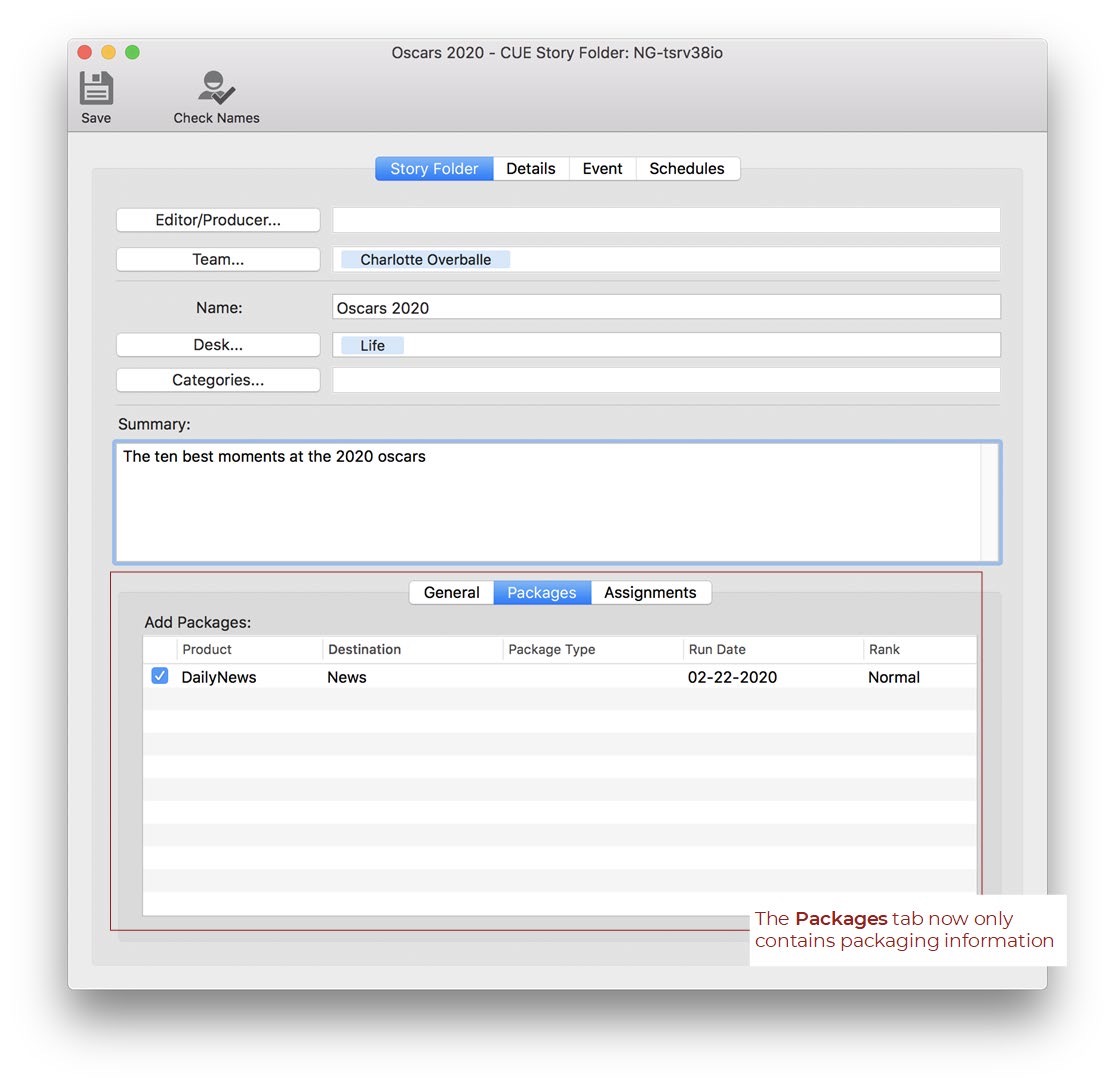
Figure 1. The Packages tab in the New Story Folder dialog.
New “Assignments” tab
In systems prior to version CUE Print 3.18.0, only text and photo assignments could be created from the New Story Folder dialog.
From version CUE Print 3.18.0, a new Assignments tab has been added to the New Story Folder dialog. This tab contains options for creating the following assignment types:
- Text
- Photo
- Graphic
- Photo gallery
- Link collection
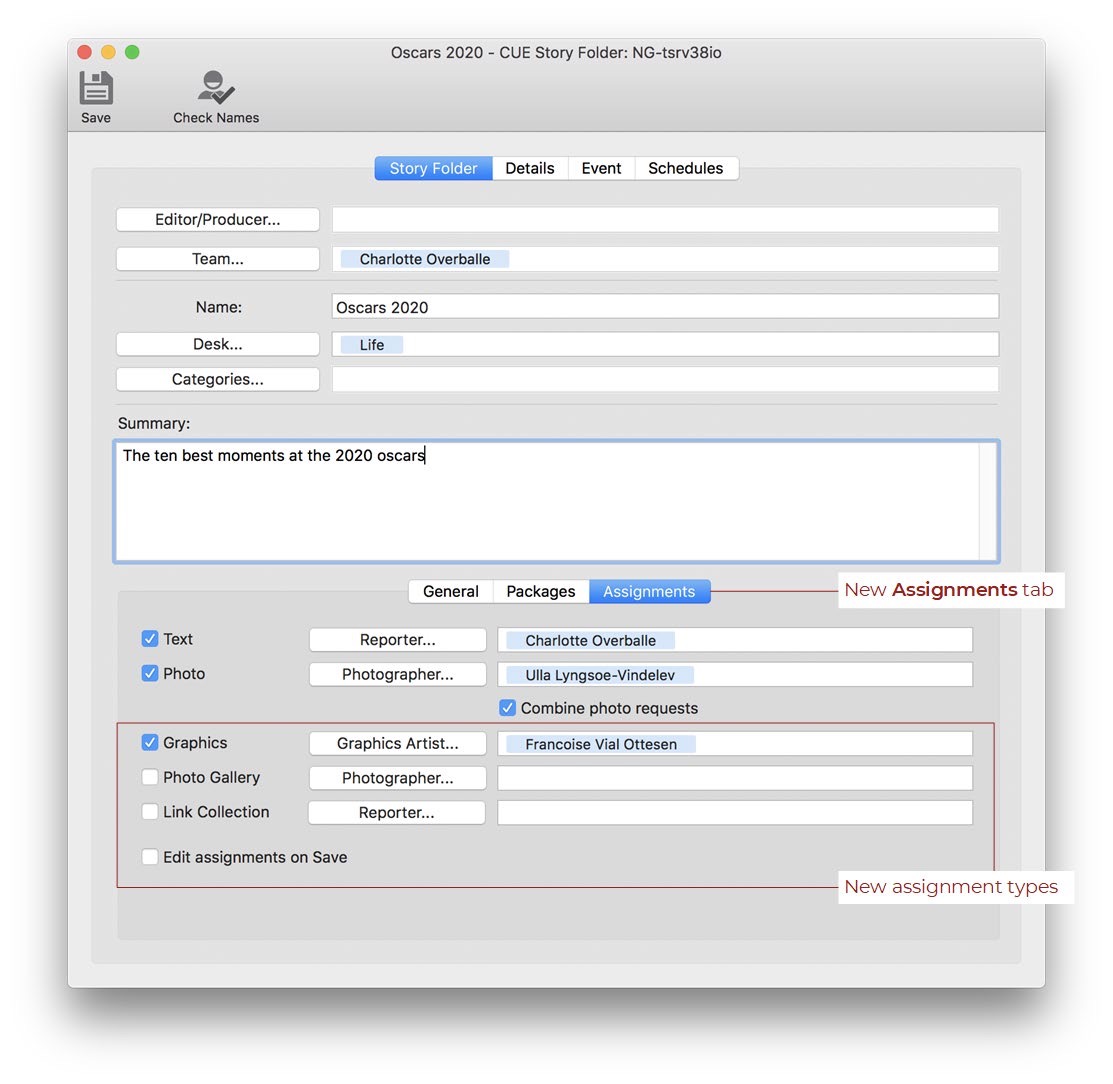
Figure 2. The new Assignments tab in the New Story Folder dialog.
Assignment behavior
The three added assignment types behave the exact same way as text and image assignments have done in versions prior to CUE Print 3.18.0.
The only exception is that the check boxes for the Graphics, Photo Gallery and Link Collection assignment types will not be checked independently of any default packages to be created, which is the case for text and photo assignments.
When the New Story Folder dialog is activated from CUE Designer or CUE Flatplanner, the assignment types found in the selected shape will of course be automatically checked.
Move element tag up/down
In order for you to be able to create your own sequence of the element tags in a text, two new “Move Tag Up” and “Move Tag Down” buttons can, from version 3.10.1, be added to the CCI NewsDirector toolbar. These buttons are used if you want to change the order of the element tags in your text.

Figure 40. The CCI NewsDirector toolbar with the move up/down arrow buttons.
Prevent Display of Inline Photos in Shared Print Texts
CCI NewsAccess
In systems prior to version 3.10.0, if you were working with an “Online first” workflow, where texts were first created for online packages and then later shared for print purposes, dragging-and-dropping an inline photo into the online text would always result in this photo also being shown in the shared print text.
The setting is made in the Setup workspace, where the “NewsRoom Configuration” object has been extended with a new “PhotoDropShareToPrint” option. You can change the value for the “PhotoDropShareToPrint” option in the “NewsRoom Configuration” XML file
Page Editing Applications in General
Parking Area in the “Components” Palette
CCI PageDirector, CCI LayoutChamp
From version 3.10.1, a new “Parking” mode is introduced in the CCI LayoutChamp Components palette and the CCI PageDirector Page Components palette.
To easily unmount items from one page to mount them on another, you can, from version 3.10.1, display all the material that has been unmounted during the current session in the Parking mode of the Components palette in CCI LayoutChamp and the Page Components palette in CCI PageDirector.
In versions prior to version 3.10.1, it could be difficult to move unmounted components to a new page. The new Parking mode displays all items unmounted during the current session, regardless of the page they were unmounted from. You can easily mount items from the parking area onto other pages.
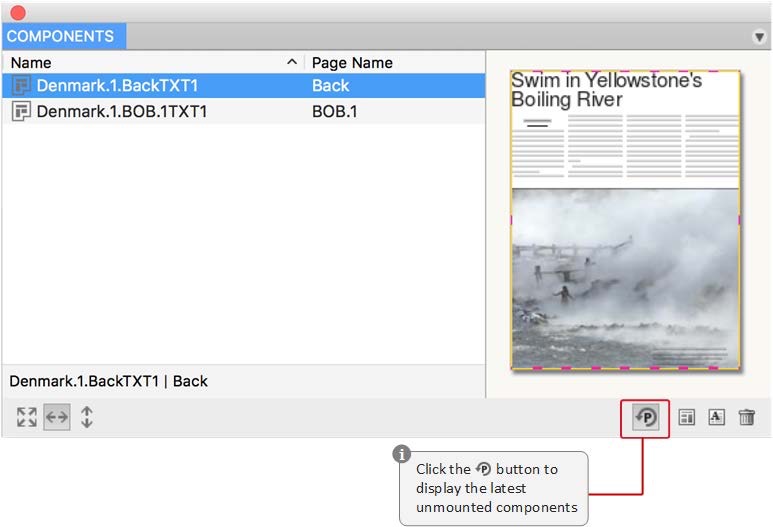
Figure 73. Parking mode in the “Components” palette in CCI LayoutChamp.
The parking area will be emptied every time you log out. The unmounted items will then be found under the pages they were assigned to.
Dummy Text Measured in Words
CCI LayoutChamp
When working with articles, it can sometimes be useful to know the number of words that need to be written. In versions prior to 3.10.1, it was only possible to have information about the number of lines in a dummy article.
From version 3.10.1, it is now possible to see the number of words contained in the article selected on the page in the Info palette.
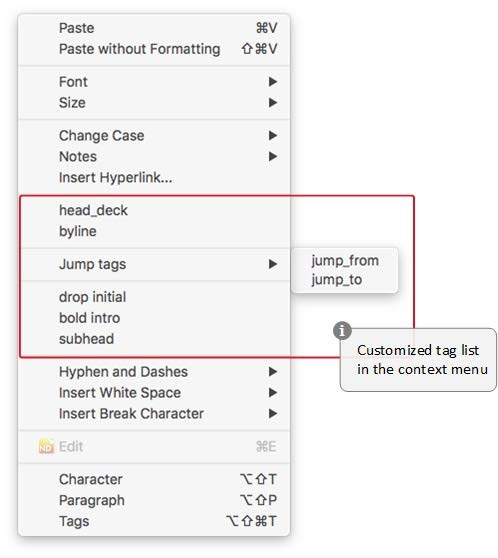
Customized Tag List in “Text” Context Menus
In order to make it faster to insert tags in a text, it is, from version 3.10.0, possible to configure a list of tags with sub-menus in the context menu, when you are working with the tool in CCI LayoutChamp. The list of configured tags is appended to the context menus for the following sections on the page:
Free Move of Elements Inside an Article Shape
CCI LayoutChamp & CCI ModelEdit
In systems prior to version 3.10.3, when you attempted to move elements inside a shape, the article frame would often be inappropriately reshaped.
From version 3.10.3, a new “Free element move inside article” option has been introduced in the CCI ModelEdit “Article Defaults”. When enabled, you can freely move the elements inside an article around on page in CCI LayoutChamp, without affecting other elements in the article.
Setting the “Free element move inside article” option
The new “Free element move inside article” option is enabled in “Article Defaults” in CCI ModelEdit:
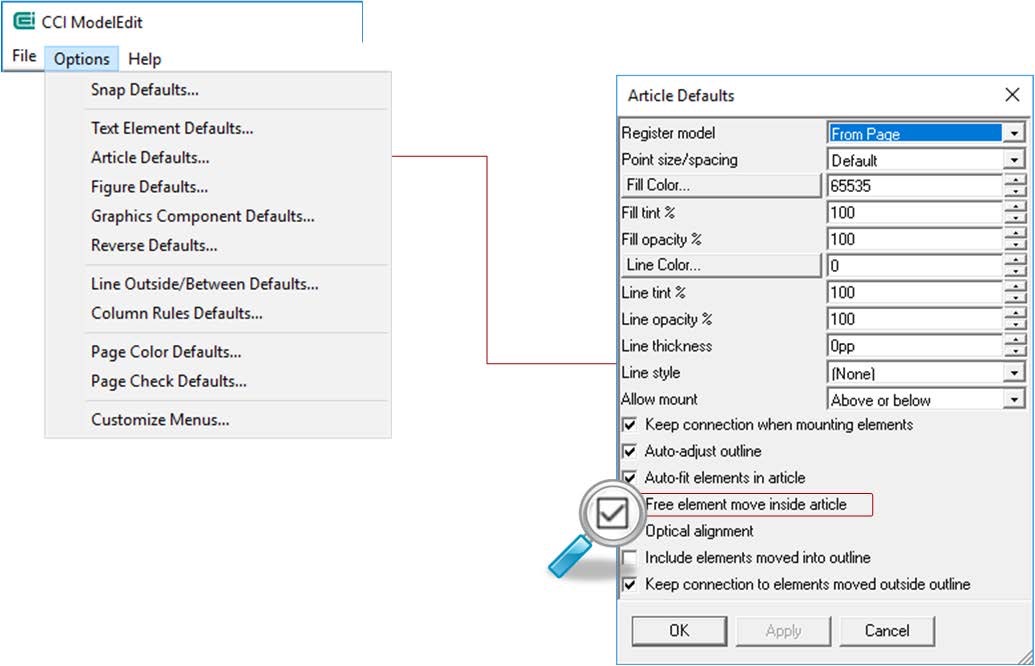
Figure 29. Enabling the “Free element move inside article” option.
Now, you can move the elements inside an article without affecting other elements in the article:
CUE Designer PlaceGun Mode
From version 3.11.0, a new PlaceGun mode has been introduced in CUE Designer. The PlaceGun can be used for fast placing of content on a page or the pasteboard without being restricted of the column area.
The PlaceGun can be loaded with texts, images and articles from the:
Components palette, Shapes palette and with images from the Desktop .
The PlaceGun is not a tool, but a mode, as the functionality is available no matter which tool you are currently working with. As soon as you have loaded the first piece of content into the PlaceGun, the cursor changes to PlaceGun mode and displays a thumbnail of the loaded element.
If you load several elements into the PlaceGun, a you will see a number in the upper left corner of the thumbnail indicating the number of loaded elements.
If the loaded element consists of more components, the number of components will be displayed in a parenthesis after the number. This means that if you e.g. load an image that has a caption and a byline, you will see the number “3” in the parenthesis.
After loading the content into the PlaceGun, CUE Designer is in PlaceGun mode, and the next time you click on the page, the topmost element of the PlaceGun is placed on the page.
When you have placed the last piece of content on the page, the PlaceGun mode is exited.
Loading the PlaceGun
You can load the PlaceGun with one or multiple elements. There are three ways to load the PlaceGun from the Components palette and the Shapes palette:
• Double-click an element in component list
• Select an element and press “Enter”
• Select an element and press the “Spacebar”
Using the “SpaceBar” option to load the PlaceGun with elements from the Shapes palette, will make the PlaceGun go into “Reuse” mode, meaning that the loaded shape will not be emptied from the PlaceGun, but can be placed several times.
You can also load the PlaceGun with contents from your desktop. This is done simply by dragging an element from the desktop to CUE Designer where it is dropped on an empty space on the page. This will load the element into the PlaceGun.
When loaded, the PlaceGun mode cursor is shown with one thumbnail if loaded with a single element. Loaded text is shown with an extract including the containing tags. Articles and images are shown as thumbnail.
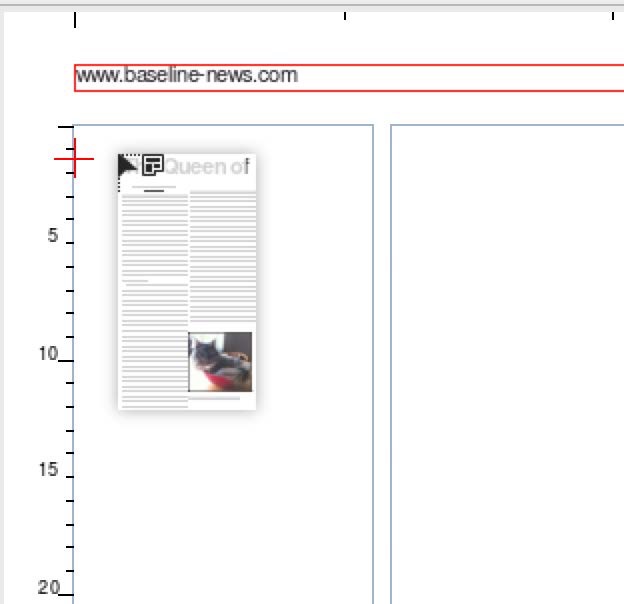
Figure 24. Example of the PlaceGun cursor when the PlaceGun is loaded with an article.
You can add components to the PlaceGun simply by loading more elements in PlaceGun mode. If you have multiple elements loaded in your PlaceGun, you can use the up/down/right/left arrows to cycle in PlaceGun elements.
When the PlaceGun is loaded with multiple elements, the number of elements is displayed in the upper left corner of the PlaceGun cursor, and the number of components contained in the top most element is displayed in a parenthesis after the number.
In the following example five pieces of contents have been loaded into the PlaceGun, and the top most element is an article, which means that this element only consists of one component. The number displayed in the PlaceGun cursor is therefore 5(1):
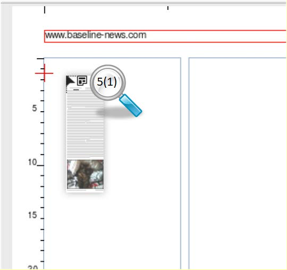
Figure 25. Example of the PlaceGun cursor when the PlaceGun is loaded with several pieces of content.
If you e.g. load an image with a cutline, a cutline credit and a cutline name into the PlaceGun, the parenthesis will display the number 4, as there are four components in the loaded element:
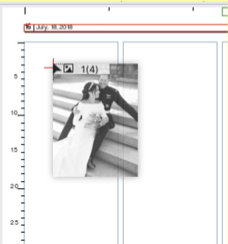
Figure 26. Example of the PlaceGun cursor when the PlaceGun is loaded with several images.
You can undo the load of the last element by means of Ctr + Z or by using “Undo” from the Edit menu.
Unload PlaceGun
You can press “Esc” to unload the front most component from the loaded PlaceGun without placing it on a page.
Placing elements from the PlaceGun
A PlaceGun component is placed by:
• clicking on the page or the pasteboard
• dragging an area with the PlaceGun cursor.
The placed content will adapt to the area.
The PlaceGun components are placed continuously, or you can cycle to the desired
component with an arrow key.
Texts:
When a text is loaded into the PlaceGun you place it one element tag at the time:
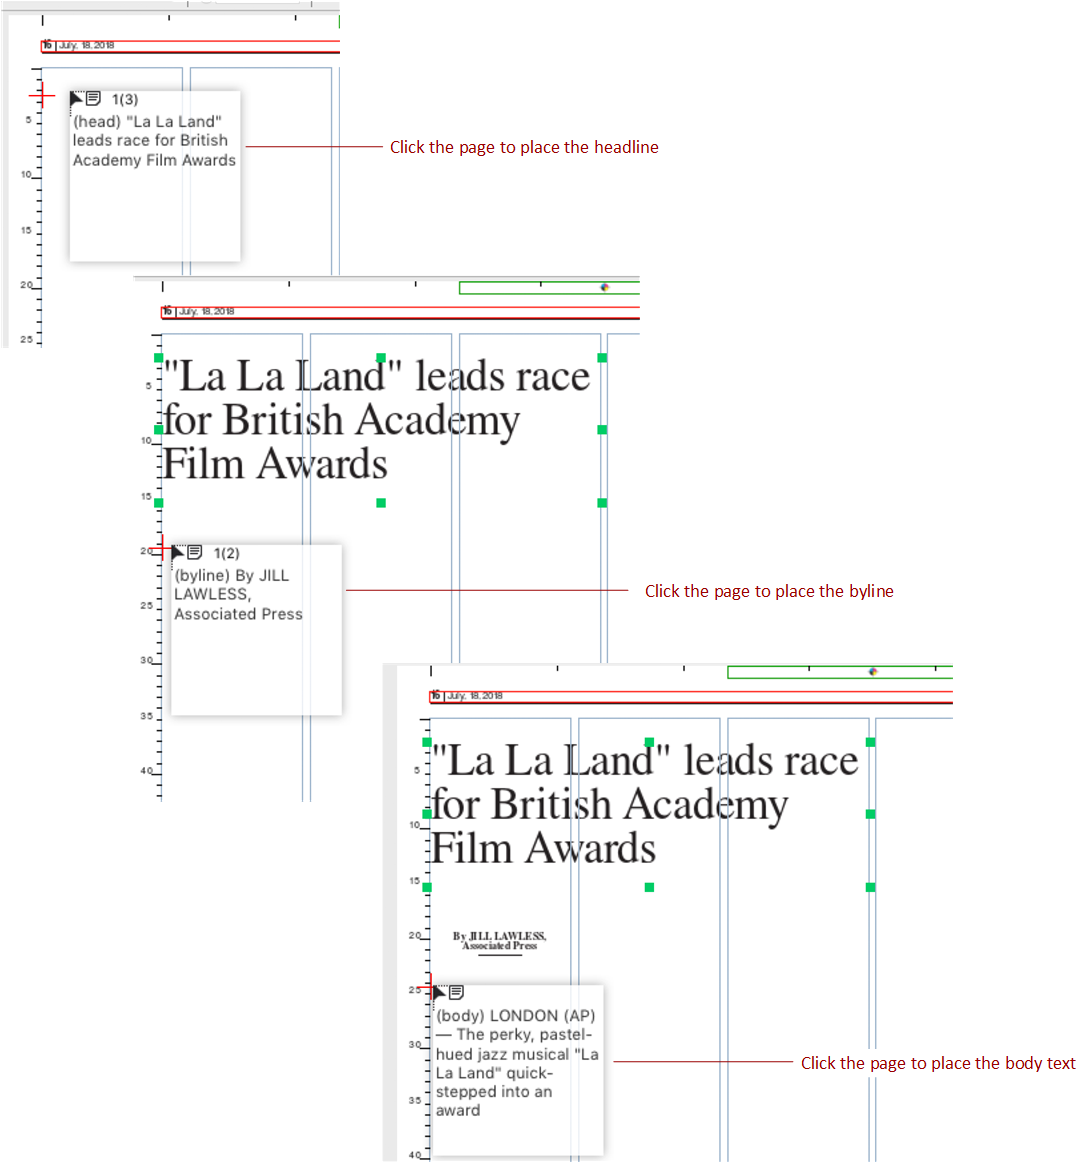
Figure 27. Example of placing a text with three element tags.
You can cycle through the individual tags by using the arrow keys.
If you drag areas for a text, each area represents a tag, meaning the you will need to adjust the frame afterwards, if the text does not fit the frame.
Images:
When you place an image, the image is placed first and the caption is following. Images keep their proportions when they are placed.
You can use the Shift key to let the dragged area change proportions.
PlaceGun reuse content from ShapeLib
If you need to place the same shape multiple times on a page, you can load the PlaceGun in a “reuse-mode” when you load a shape from the Shapes palette
This is done by selecting the desired shape and press the “Spacebar”. This will make the PlaceGun go into a mode where the shape can be placed multiple times.
When you place the shape on the page, the shape stays loaded in the PlaceGun until you remove it by pressing “Esc” or exit the PlaceGun mode.
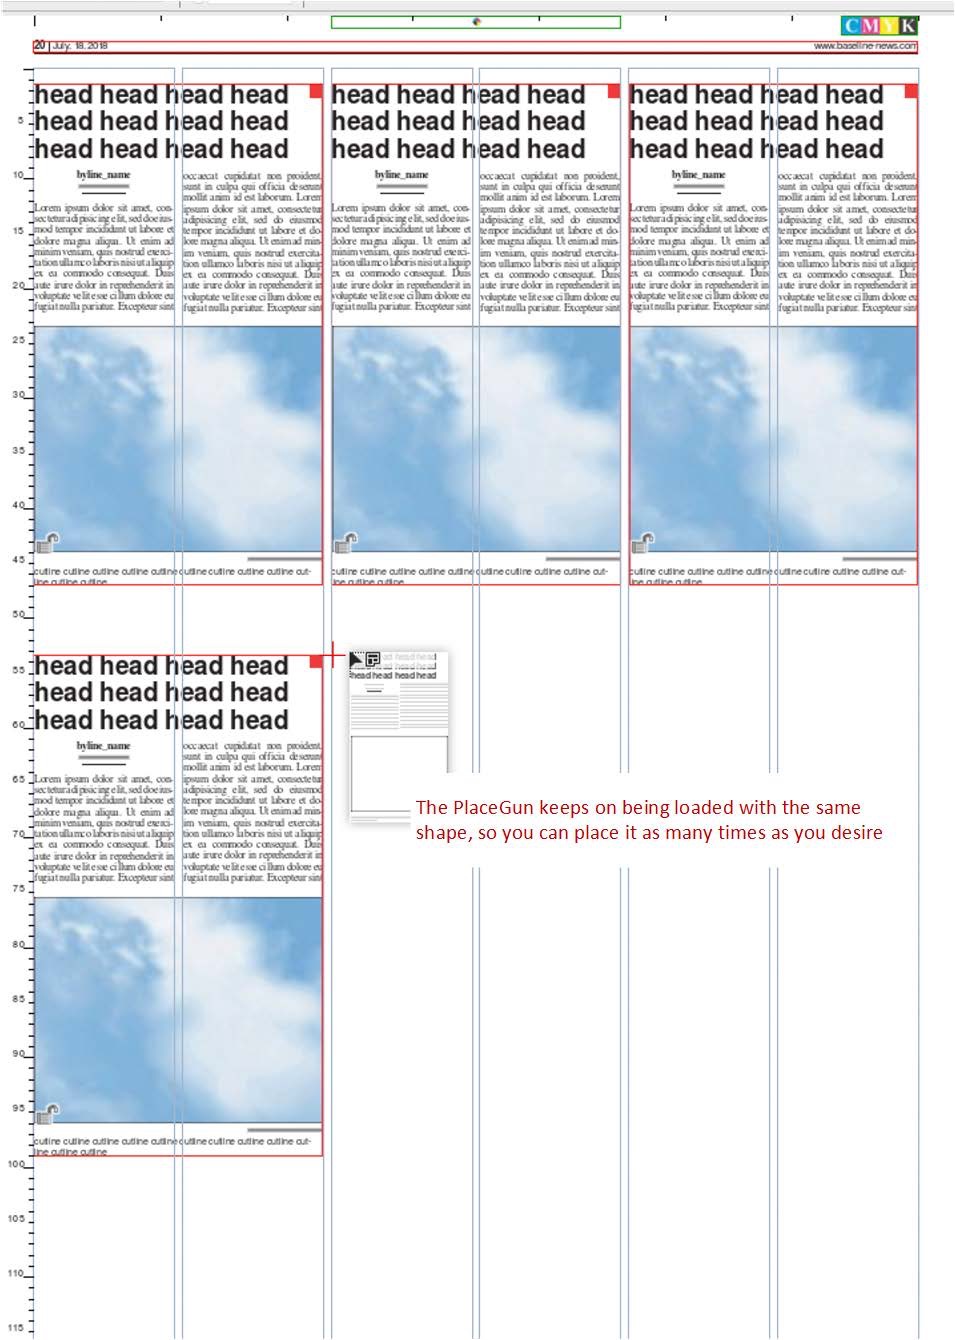
Figure 28. Re-using the same shape multiple times on a page.
Exit PlaceGun mode
You exit PlaceGun mode by:
- Placing all elements that have been loaded into the PlaceGun. When the last element of the PlaceGun in placed on page, CUE Designer exits the PlaceGun mode
- Clicking any tool. This will unload everything from the PlaceGun and exit PlaceGun mode
Temporarily suspending PlaceGun behavior when in PlaceGun mode
PlaceGun action is always the primary behavior when you are working in PlaceGun mode. But if you for some reason need to suspend the PlaceGun behavior, this is done by using the “Ctrl” key as modifier.
This is useful if you e.g. have the PlaceGun loaded with an image, and you want to replace a dummy photo in an article with the loaded image. You can then Ctrl-click the photo in the dummy article to replace the dummy photo with real content.
…
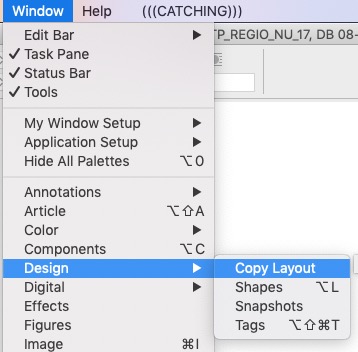
Gebruik van pagina template in Designer
In CUE Print kun je nu in Designer naast Shapes ook direct hele Template Pagina’s op een pagina zetten.
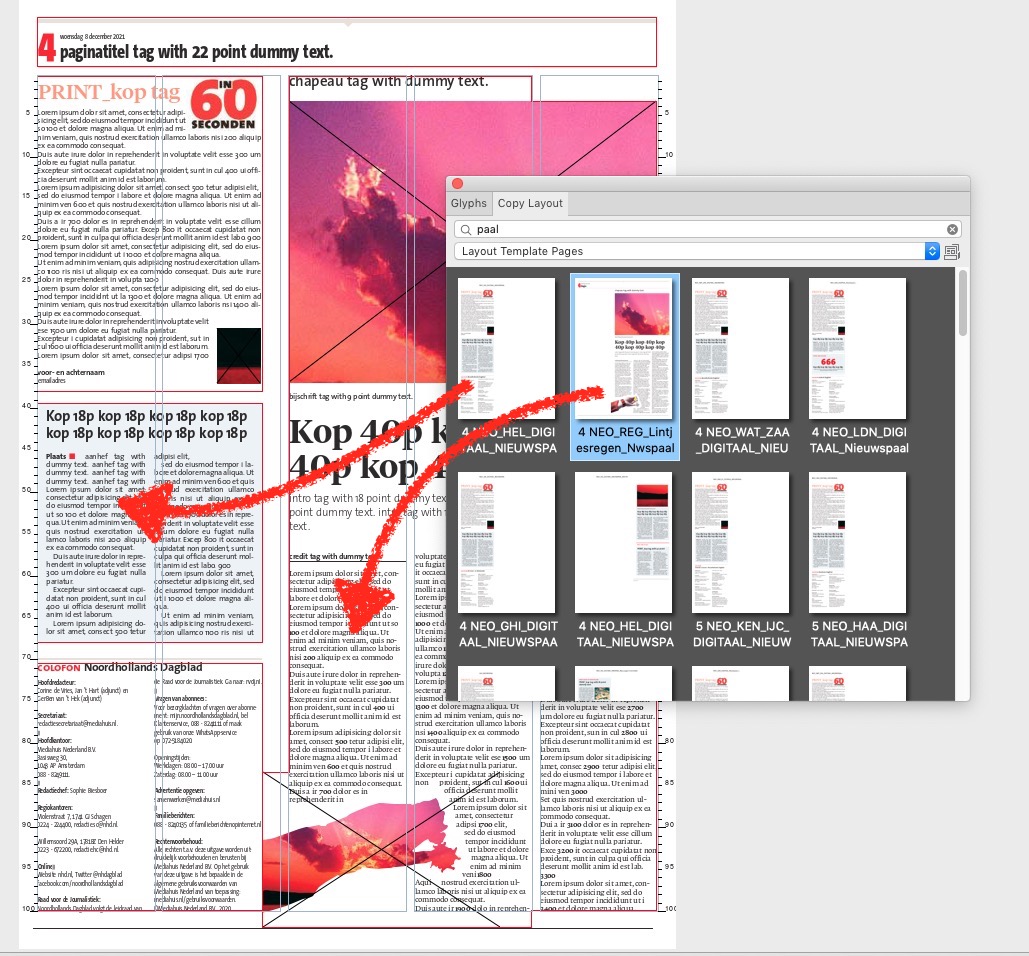
Maar; let op, met deze methode kopieer je de template pagina naar de productie pagina. Er is dus geen enkele link met de oorspronkelijke template pagina, wijzigingen daar komen dan ook niet door op de productie pagina.

Template pagina gebruikt in Designer zie je niet terug in OnePageDetailed in FlatPlanner
Het scheelt wel lekker tempo als je bezig bent in Designer. Voor het gebruiken van een template pagina hoef je niet eerst naar FlatPlanner
Keep Names from Shape in “Shapes” Palette
CUE Designer
In systems prior to version 3.11.0, when a shape from the Shapes palette was placed on a page in CUE Designer, the name of the shape, and the names of the individual elements in the shape would be renamed to a default system name.
From version 3.11.0, the placed article will keep the name form the shape in the Shapes palette.
Furthermore, if the shape contains elements that has been specifically named, these elements will also keep their name when the shape is used on a page.
Please note that this applies to all other elements than the text. The text in the shape will still be default named by the system.
When the shape is used on a page, the article and images keep their names. In the following example a shape with two images named “Byline Pic” and “Article Pic” has been named “Editor in Chief Article” and has been added to the Shapes palette.
Change in Naming of Multiple Pages in CUE Flatplanner
CUE Flatplanner
In versions prior to version 3.13.0, when renaming several pages in one go in CUE Flatplanner, a period was inserted automatically after the new name and followed by a number, e.g. if several pages were selected and “Entertainment” was entered in the Name field of the Properties task pane, the “Entertainment.1”, “Entertainment.2”, etc.
From version 3.13.0, the period is no longer inserted automatically between the page name and the serial number added to it. If, for example, you select several pages and enter “Entertainment” in the name field of the Properties task pane, the pages will be named automatically “Entertainment1”, “Entertainment2”, etc. You can add the period manually afterwards if needed.
CUE Designer
Increased Page Zoom Factors
CUE Designer, CUE Composer & CCI ConfigurationManager
In systems prior to version 3.14.0, the maximum page zoom factor in CUE Designer and in CUE Composer “Preview” mode was 400%.
From version 3.14.0, this zoom factor has been increased to 4000%. This will make it easier for you to precisely place components, e.g. page furniture, on a page in CUE Designer.
Remove Unused Items from the “Components” Palette
CUE Designer & CUE Flatplanner
In systems prior to version 3.14.0, if you had a large number of unused items that you did not want to use in the Components palette in CUE Designer or CUE Flatplanner, you had to remove each item one at a time. This was done by selecting the item in the Components palette and apply the “Remove from Components” context menu option.
From version 3.14.0, a new “Remove all Unused Elements from Components” context menu option has been introduced in the Components palette.
This option makes it possible for you to remove all unused item from the list of components in one go. In order to remove the items, you just have to anywhere in the Components palette and apply the “Remove all Unused Elements from Components” context menu option.
Creating Layout Template Pages based on Production Pages
CUE Flatplanner & CUE Designer
In systems prior to version 3.14.0, template pages needed to be created in the “Template Pages” library. After creating the pages, you had to build the pages from scratch in one of the page editing applications.
From version 3.14.0, you can now create new layout template pages on the basis of exiting spans/pages in CUE Designer and CUE Flatplanner. This is done by means of a new “Save Page(s) as Layout Template” option found in the File menu in both applications.
Figure 11. The new “Save Page(s) as Layout Template…” menu option in CUE Flatplanner.
• What is copied to the layout template page?
When the pages are copied as layout template pages, there are a few rules that apply.
• Ads on the page(s) are not copied to the layout template page(s).
• Any master page elements and content template page elements on the page(s) are copied as they are. I.e. they do not turn into dummy.
• All other elements become dummy layout.
• Article tag sets will only contain the tags used in the article. I.e. the articles are using the
local tags.
Selecting pages as the basis for layout template pages.
Depending of which page layout application you work in, there are different ways of selecting which pages should be used as the basis for layout template pages.
When you work in CUE Designer, all the pages that you have currently displayed are copied to the Templates library when you apply the ”Save Page(s) as Layout Template…” menu option:
If there are jump stories on the pages
Jump stories are copied to the layout template pages with the jump connections preserved. If you select a span or single page(s) containing part of a jump story, a warning is shown if jump stories are running outside the selected pages. You can then decide to ignore the warning or cancel the operation and e.g. include the page(s) with the missing part of the jump(s) before applying the “Save Page(s) as Layout Template…” menu option again.
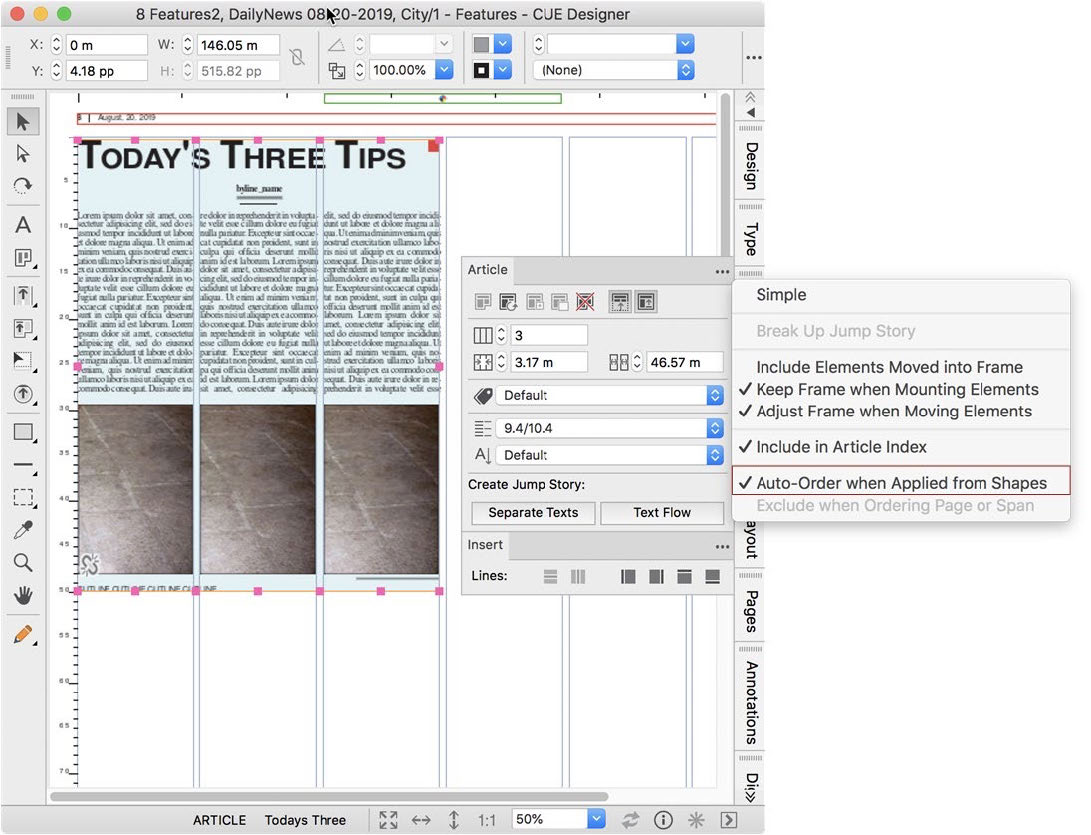
Auto-ordering of Shapes from the “Shape library”
In systems prior to version CUE Print 3.16.0, a shape placed on a template page could be auto-ordered, when the template was used on a destination page.
From version CUE Print 3.16.0, you can now mark shapes with a new auto-ordering option before placing them in the “Shapes library”. When this option is set on a shape, the content of the shape is auto-ordered when you drag the shape from the Shapes palette to a page in CUE Designer, or from the Shapes task pane to a page in CUE Flatplanner Layout mode. As soon as the page is saved a new story folder with a package is created.
How to mark a shape for auto-ordering
Marking a shape for auto-ordering is done in CUE Designer, where a new Auto-Order when Applied from Shapes option has been added to the Article palette’s fly-out menu.
CUE Designer Zero Point Reference
In CUE Designer, the default zero point for measurements of the page is the upper left corner of the column area. But in many cases, you may always want the zero point of the page to be the upper left corner of the page e.g. in connection with setup work of magazine production. 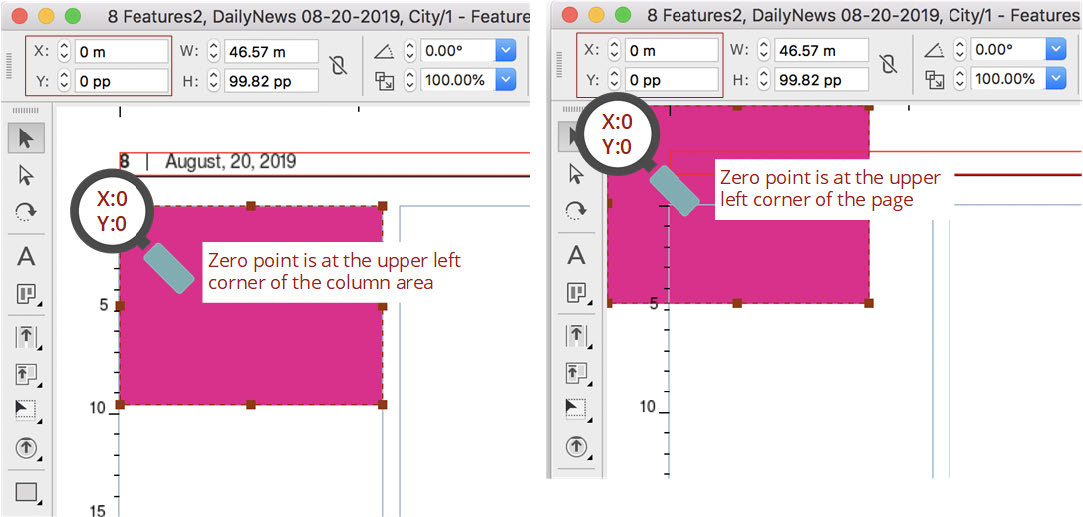
Figure 25. The default zero point versus zero point at the upper left corner of the page.
From version CUE Print 3.16.0, when you change the zero point for the page, this change is automatically saved and becomes the new default until you change it again. This means that after restarting CUE Designer the zero-point change is still effective.
There are no changes to how you change the zero point. This is still done from in the Zero Point tab in the CUE Designer Preferences dialog.
But now the zero-point setting is saved in a new CUE Designer preferences file that only contains the zero-point preferences. The zero point setting is product independent meaning that it will apply to all pages you work on in CUE Designer, no matter which product they belong to.
Bevel Corners on Figures
From version CUE Print 3.16.0, a new bevel corner option for rectangles has been added to the Figures palette. This option lets you make bevel corners on one or multiple corners of a rectangle:
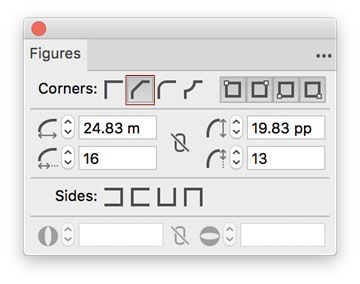
Figure 28. The new option in the Figures palette.
When creating bevel corners, you have the exact same possibilities available as when making rounded corners in systems prior to version CUE Print 3.16.0. This means that you can enable/disable corners, set the actual and relative corner values, and define open side, in connection with setting the bevel corner values.
The following illustrations show examples of various bevel corners:
Scaling Page Elements Proportionally
From version CUE Print 3.16.0, a new possibility to scale one or more selected elements on the page proportionally has been introduced. This functionality is useful e.g. when you want to adapt page content to a new page size.
When using the scale functionality, the bounding box of the selected elements will be enlarged or reduced proportionally depending of the scale factor. The elements and the spacing between them are changed relatively. The fixpoint of the scale depends on how the scaling is done.
Please note that the scaling is undoable, and furthermore, the scale history is not kept on the elements – only the result of the scale.
***add images***
Figure 40. The upper left corner is fix point for scaling from the “Edit” bar.
On the page by dragging with a modifier key – Interactive scale
Scaling on the page is available in CUE Designer when the

is selected and in CUE FlatPlanner Layout mode.
Scaling directly on the page is done by selecting the relevant elements and pressing
***add images***


(Ctrl + Shift on Windows clients) to enter the scale mode. The bounding box of selected element(s) is now shown with a brown broken line and brown handles.
Drag-and-drop a Shape from the Shape Library to a Specific Position in an Article
In systems prior to version CUE Print 3.17.0, when a shape, e.g. a quote or an image with a caption, was dragged-and-dropped into an article on the page, the shape would always be placed in the upper-left of the first body text column in the article.
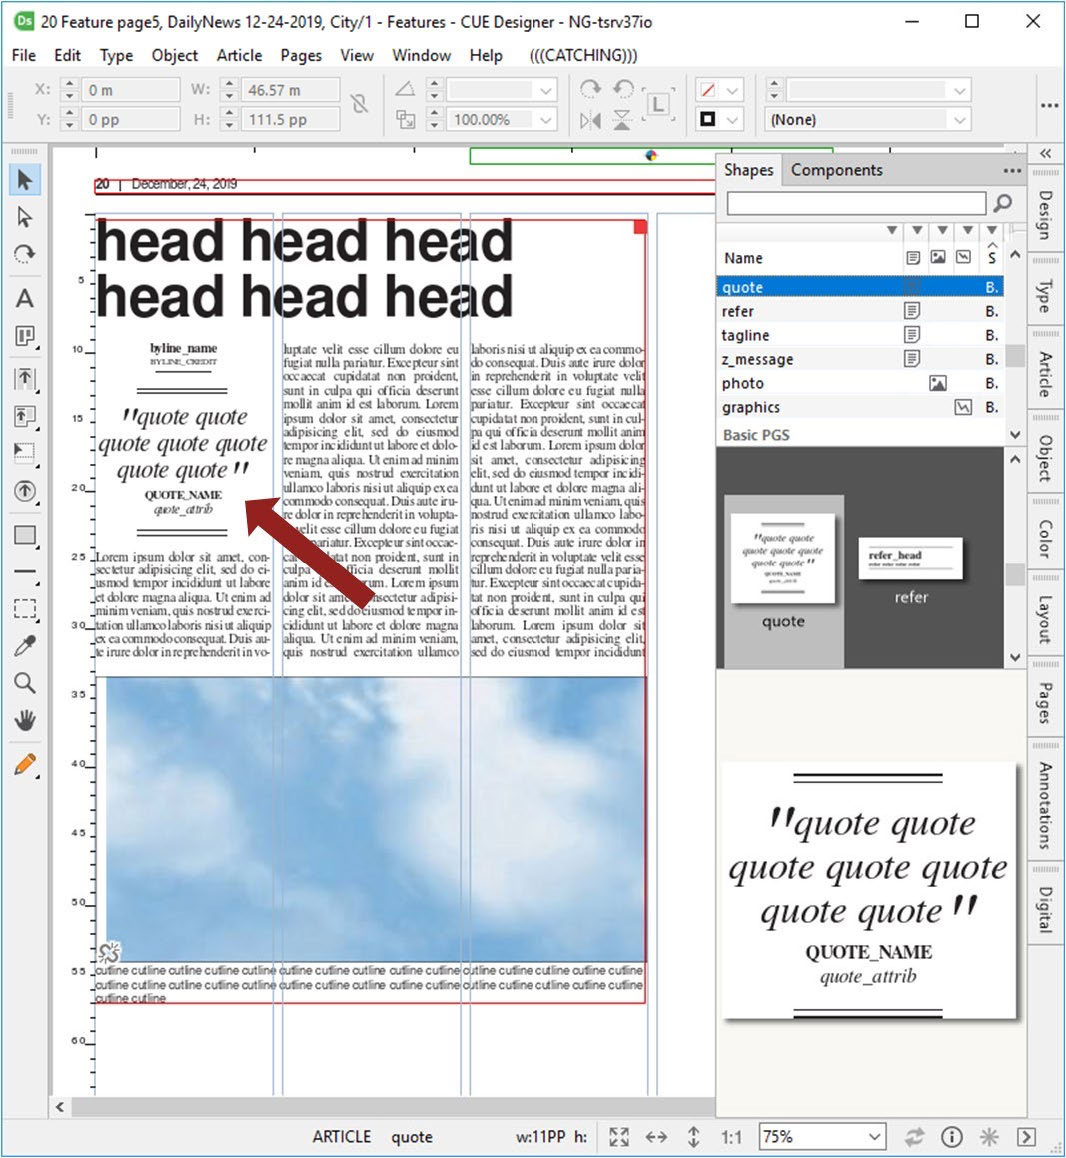
Figure 10. Dragging-and-dropping a shape inside an article in systems prior to version CUE Print 3.17.0.
From version CUE Print 3.17.0, a new “Place at position mode” with has been introduced in CUE Designer and CUE Flatplanner Layout mode.
This new functionality makes it possible for you to drag a shape from the shape library and place it in a specific position:
• Completely inside an article on the page, which will include the shape in the article
• Anywhere on a page outside articles, which will create a new article on the page.
The new “Place at position” mode is activated by using the Shift key as modifier when performing the drag-and-drop operation.
Important information:
In systems prior to version CUE Print 3.17.0, the Shift key was used as modifier when replacing articles on the page.
From version CUE Print 3.17.0, the “Replace article” functionality is now activated by using Cmd/Ctrl + Shift while dragging-and dropping a shape to a page
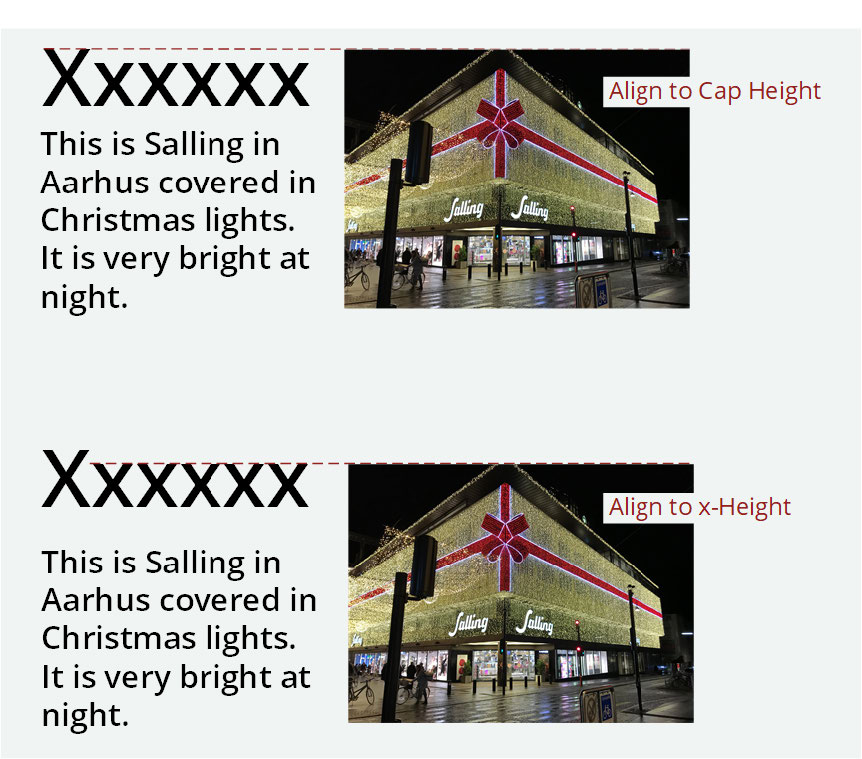
Optical Alignment Options
CUE Designer has an optical alignment function, that controls the vertical position of text lines, e.g. when a text box is placed next to an image.
In systems prior to version CUE Print 3.17.0, this alignment has, per default, been an alignment to the cap height of the applied font.
However, in some page layouts it is preferred that the alignment is made according to the x- height of the applied font. Therefore, it is from version CUE Print 3.17.0, now possible to choose whether the alignment of text and images should be aligned according to Cap height or x-height of the applied font.
Bullets and Numbering
From version CUE Print 3.17.0, you can now control the parameters in a bullet/numbering list by means of a new Bullets and Numbering dialog. This means that it has become easier to make on-the-fly changes to a bullet list in CUE Designer.
From version CUE Print 3.17.0, two new menu options have been added to the Paragraph palette fly-out menu.
• Bullets and Numbering… – opens the Bullets and Numbering dialog
• Bullets – used for toggling between a bullets list and no bullet list
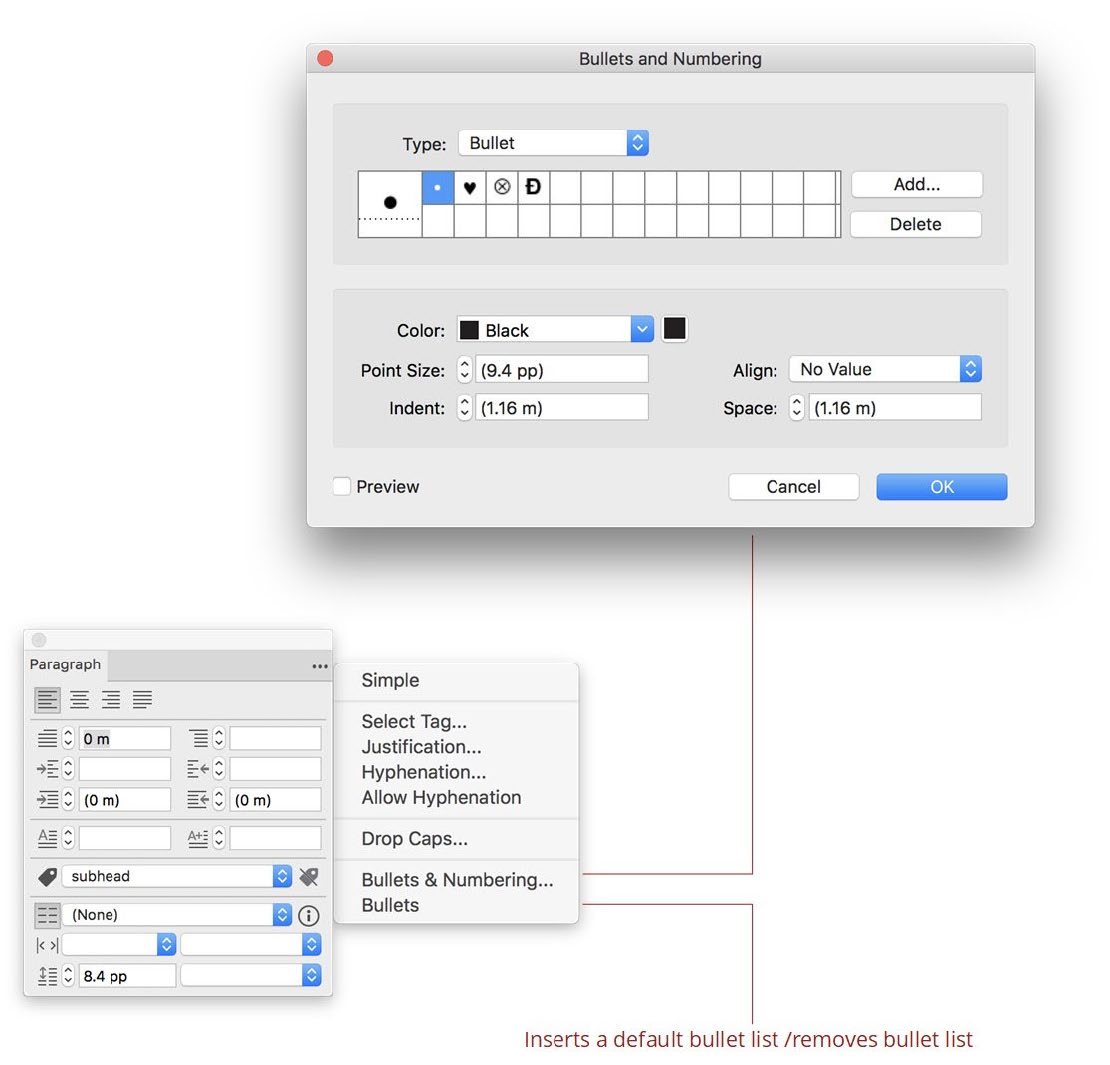
Figure 28. The new bullet menu options in the Paragraph palette fly-out menu.
About the Bullets toggle option:
The Bullets toggle option is used inserting a default bullet list (with bullets) this option is equivalent to the

• icon on the text editing toolbar. When you toggle the option off, the bullet list is removed.
The Bullets and Numbering dialog
The Bullets and Numbering dialog can apply to one of two bullet modes; Bullet or Numbering. This is selected from the Type drop-down list
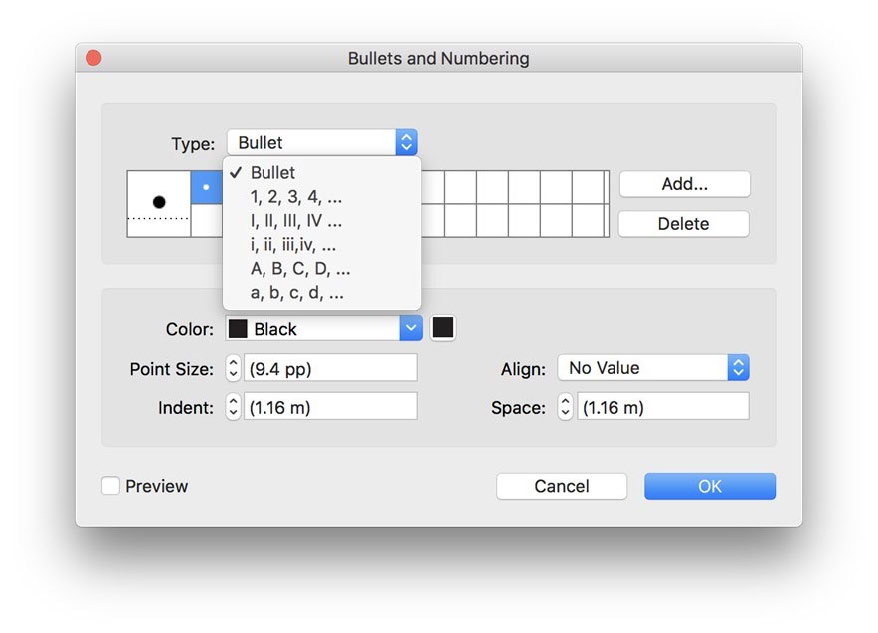
Figure 29. Selecting the bullet type.
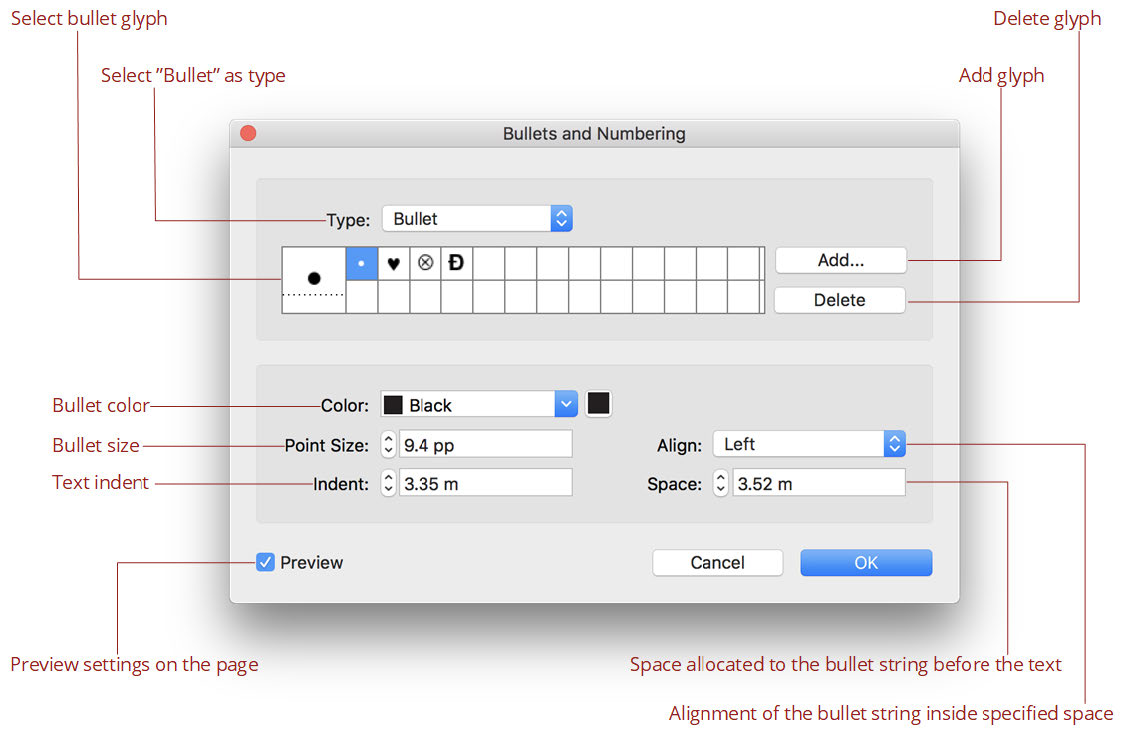
Figure 30. The Bullets and Numbering dialog in Bullet mode.
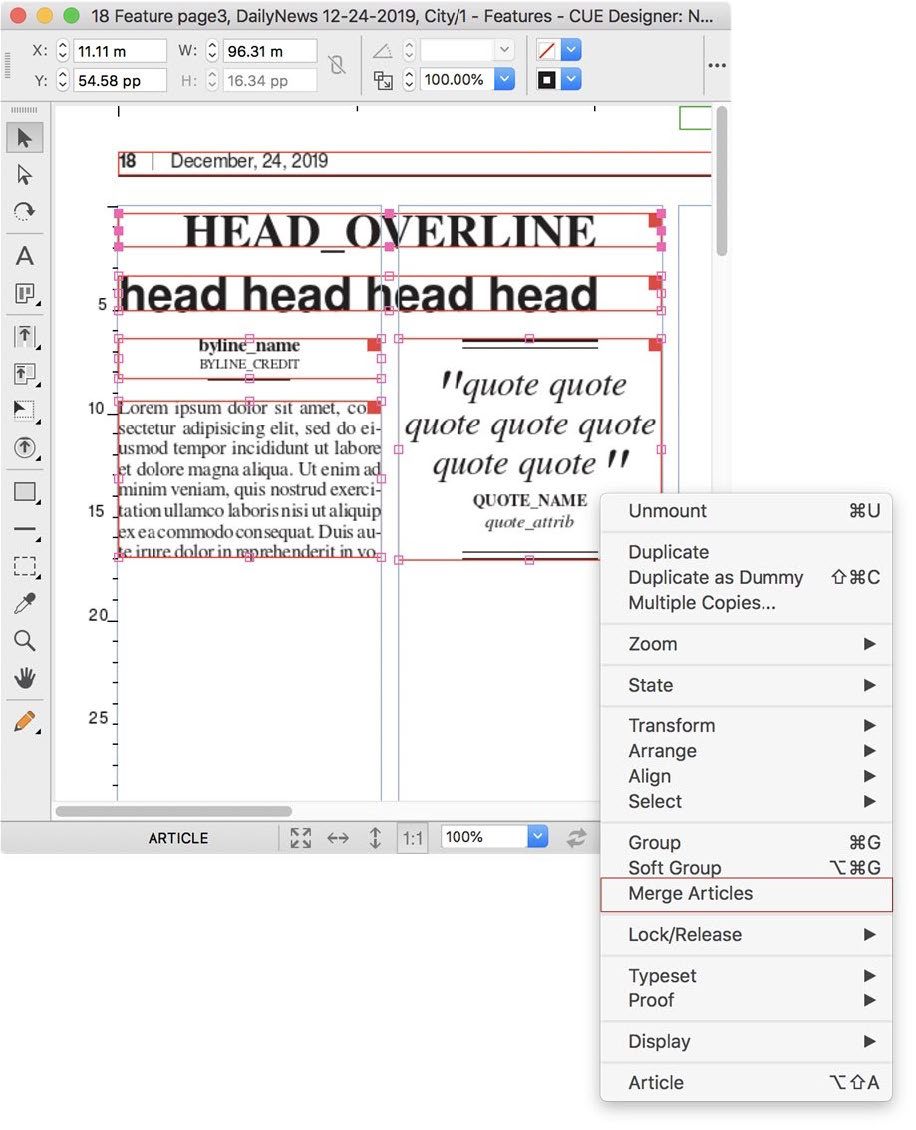
Merging Dummy Articles into One Article
From version CUE Print 3.17.0, it is now possible to combine multiple articles on a page into one single article.
This functionality is very useful in cases where you have built a dummy article layout by placing several individual element shapes on the page and wish to merge these into one article.
When you place shapes from the Shapes palette on the page, each of these shapes becomes an individual article. With the new Merge Articles option, you can now combine all the separate articles in to one single article on the page.
The new Merge Articles option is available in the context menu for multiple articles or from the Article menu → Merge Articles.
When this option is applied to two or more articles selected on the page, the primary selected shape becomes the main article. All other selected articles are broken up, and their content is added to the main article.
Prerequisites
For the Merge Articles option to be available, a number of criteria must be fulfilled:
• You have selected articles on the page
• At least two articles must be selected
• All selected articles must be on the same page (this also applies for spread pages)
• The selected articles must not be jump stories
• The selected articles cannot not be a combination of ordinary articles and sub-articles. The selected articles must either all be sub-articles belonging to the same package, or none of the selected articles can be sub-articles
How to merge articles
In the following example, five article shapes have been placed on the page to form an article. All the articles have been selected.
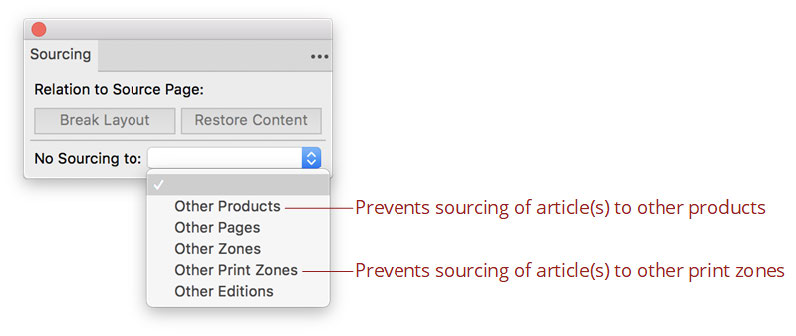
Prevent Sourcing of Articles to Other Products or Other Print Zones
In CUE Designer you can set a “no sourcing” option on articles that should not be sourced to a destination page. From version CUE Print 3.17.0, two new options have been added to the No Sourcing to drop- down list. The new options are:
Option
Other Products Other Print Zones
CUE Print – Release Notes How to Setup and Use CUE Print CUE Print 3.17.0 Functionality
Description
Other Products – Prevents the selected article(s) from being sourced to other products
Other Print Zones – This is especially useful for cases where a product contains print zones and digital zones. When this option is set, the selected article(s) will be sourced to any digital zone within the same product, but not to other print zones within that product
Exit CUE Designer Without Being Prompted for Workflow State Changes
Defining whether dialog is shown or not
In the Setup workspace, a new tag has been added to the Page Workflow Configuration object.
False
This tag is used for defining whether the Change Workflow State and Save Changes dialog is displayed when closing CUE Designer, or not.
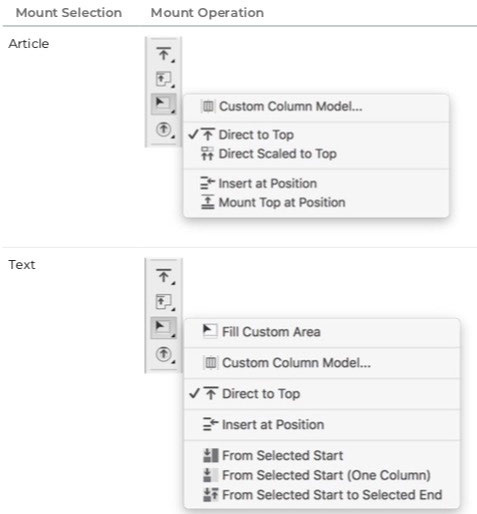
Mount Tool Enhancements
In systems prior to version CUE Print 3.18.0,
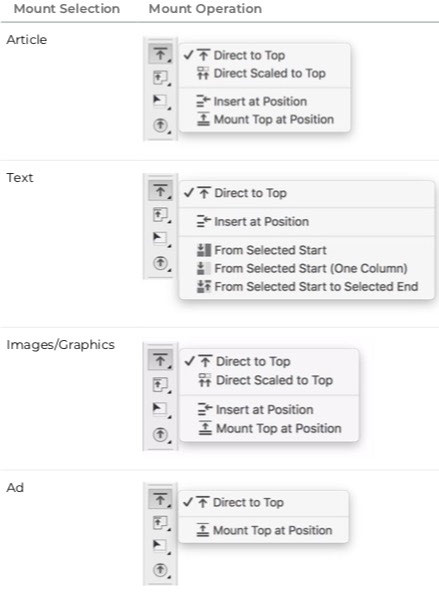
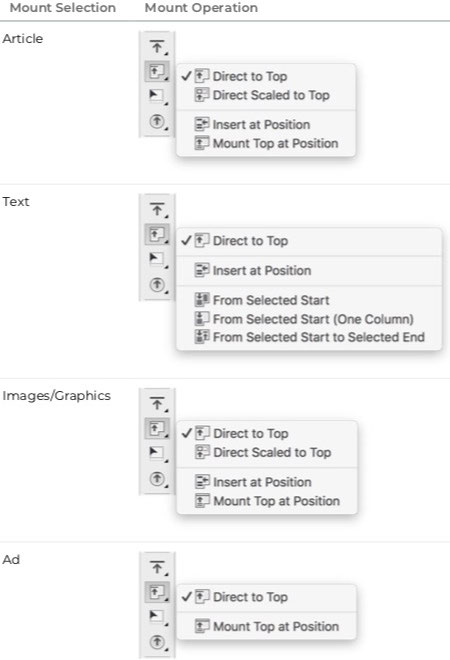
From version CUE Print 3.18.0, interface changes have been made to the Mount tool in CUE Designer.
To make it easier to distinguish between the various mount options, the icons depicting the mount operations for the “Mount on Page” and “Mount in Article” have been redesigned
Furthermore, inactive fly-out menu options for all mount tools have been hidden. This means that you now only see the mount options that can be used for the selected mount source.
It also means that there will be no fly-out menu if no mount source has been selected.
“Mount on Page” tool.
“Mount in Article” tool
Below, you can see the possible mount operations for the tool and the various mount source combinations:
“Custom Area Mount” tool –Custom column model not created
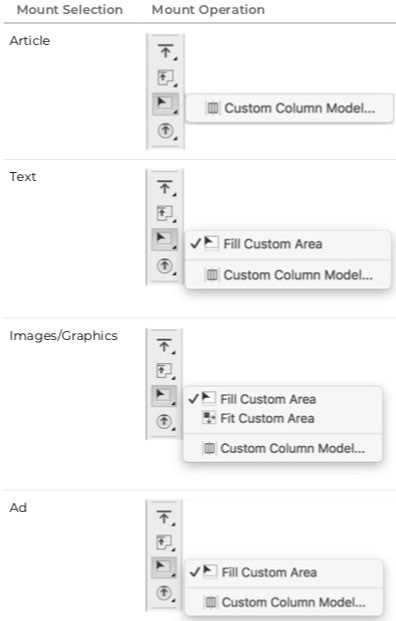
“Custom Area Mount” tool –Custom column model created
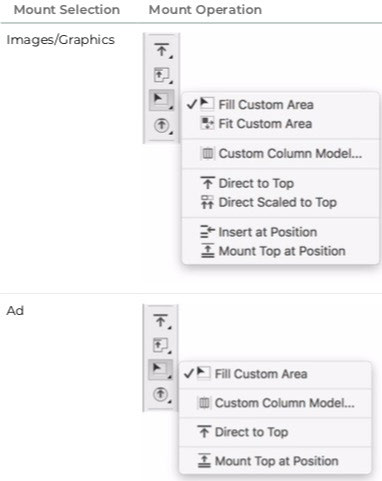
Picture Clipping Paths in CUE Designer
From CUE Print 3.18.0, you can now decide whether to use the masks on photos created in external systems e.g. Adobe Photoshop, or not.
A new Hide Clipping Path flag has been introduced in the Image palette fly-out menu. You can set the “Hide Clipping Path” flag on a photo:
• on the page
• in the Component palette
Switching from “Move” to “Copy” – Zone Article
In systems prior to version CUE Print 3.21.0, when dragging-and-dropping an article to a page in CUE Designer or CUE Flatplanner, it was possible to toggle from move to copy by means of the following modifier:
• Mac: option
• Windows: ctrl
From version CUE Print 3.21.0, you can now use Shift as modifier to switch a move into a copy, when dragging-and-dropping an article to a page or Components palette in CUE Designer or CUE Flatplanner.
The source of the drag can be:
• an article in the Components palette in CUE Designer or CUE
Flatplanner
• an article list in the Pages Workspace
• a package list in the Planning Workspace
The destination can be:
• the page area in CUE Designer or CUE Flatplanner
• the Components palette list in CUE Designer or CUE Flatplanner
Furthermore, using the Shift key as modifier, will also switch from move into copy when the source is a package list in Planning workspace, and the destination is the navigation tree in the Planning workspace Navigation pane.
Overview of copy and move operations
You can find an overview of existing and new copy and move operations for articles and packages in the “Drag-and-Drop Copy and Move Operations” document published with this release note on http://customer.ccieurope.com/documentation/release-notes/cci- newsgate.aspx.
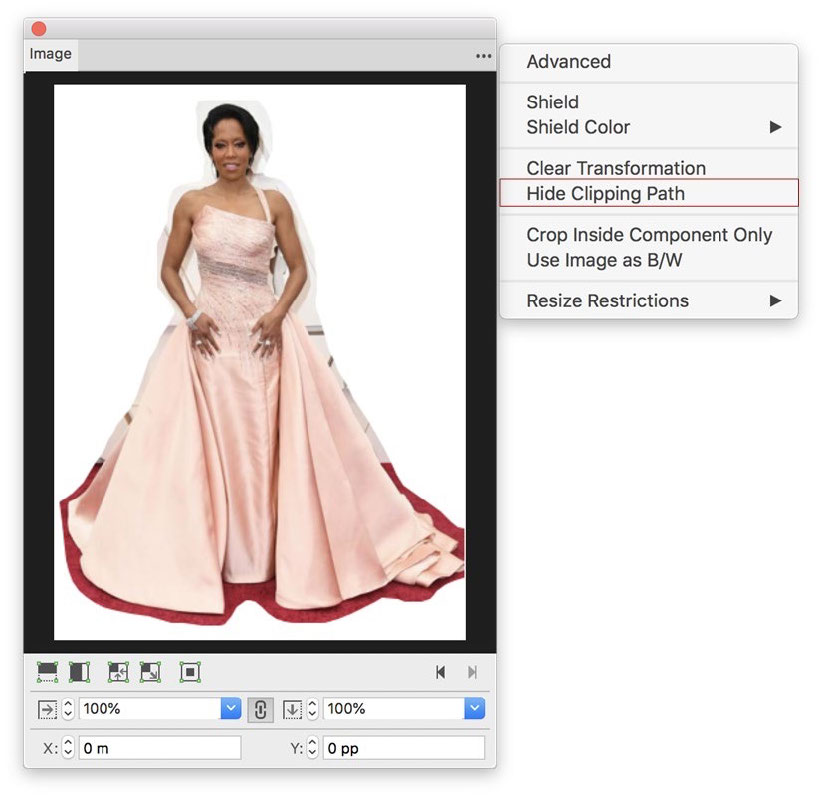
Template Pages Containing Spreads
From version CUE Print 3.21.0, the list of template pages in the Templates Pages task pane will no longer show right-hand spread pages.
Please note that you may see the right-hand spread pages in the preview together with the left-hand page, when selecting the left- hand page,
Applying templates containing spreads
In systems prior to version CUE Print 3.21.0, spread page templates could only be applied to pages that were already defined as spreads in the page plan.
From version CUE Print 3.21.0, when applying template pages,single pages, spreads or spans, spreads are created, if found on the template pages.
Figure 7. Applying a spread template to two single pages.
A spread is now automatically created
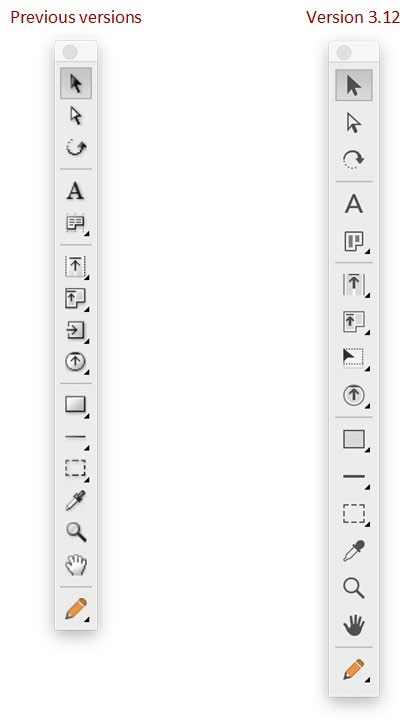
Figure 2. The difference between “Tools” in previous versions and version 3.12.0.
Edit Bar Icons
The following illustrations show the updated Object Edit bar icons for the various element types:

Figure 3. Contents of the “Object Edit” bar for Articles.

Figure 4. Contents of the “Object Edit” bar for Images.

Figure 5. Contents of the “Object Edit” bar for Text elements.

Figure 6. The “Edit” bar for I-beam and highlighted text.

Figure 7. Contents of the “Object Edit” bar for Figures selection.

Figure 8. Contents of the “Object Edit” bar for Multiple selection.
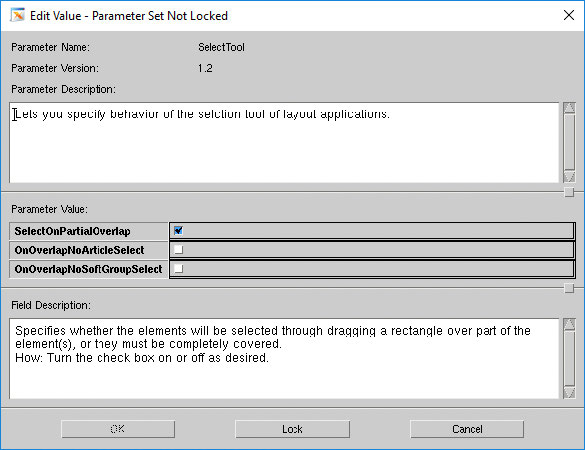
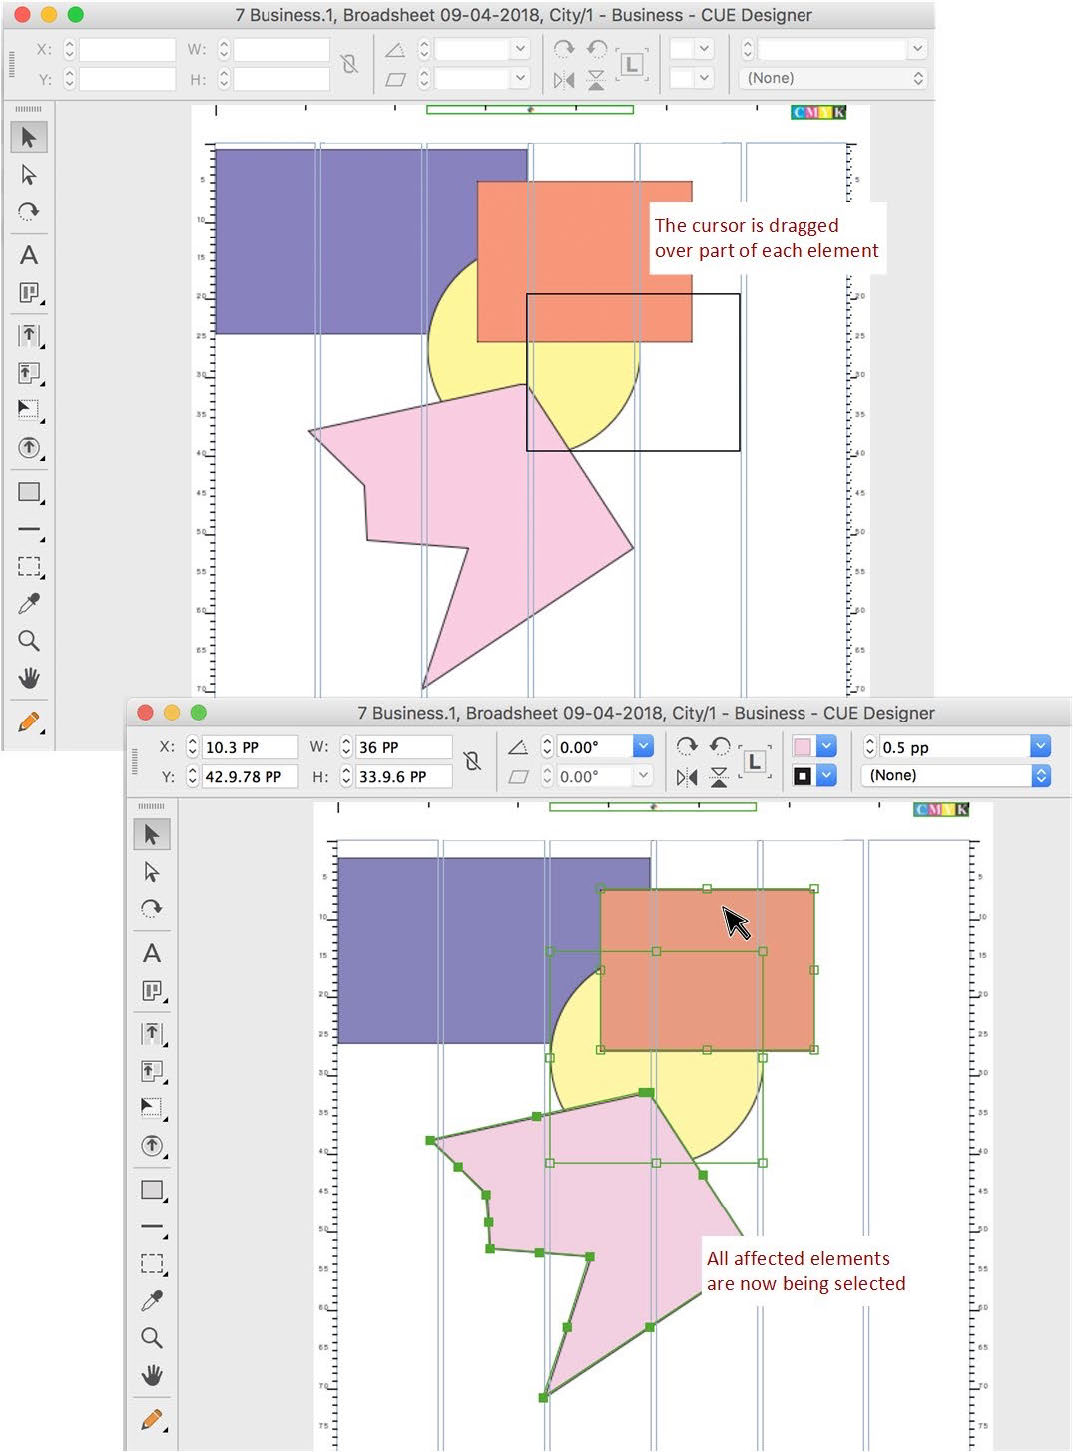
Selecting Elements with a Rectangle not Covering the Entire Elements
CCI ConfigurationManager & CUE Designer
In CUE Designer, you can select elements on a page by dragging a rectangle over the elements you want to select. In order to select the elements, they need to be fully contained
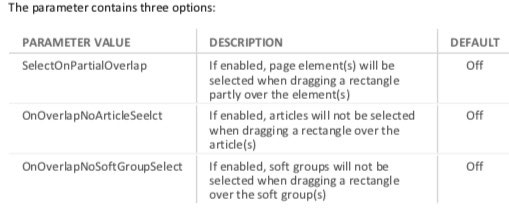
CciApps.Tools.SelectTool.SelectTool
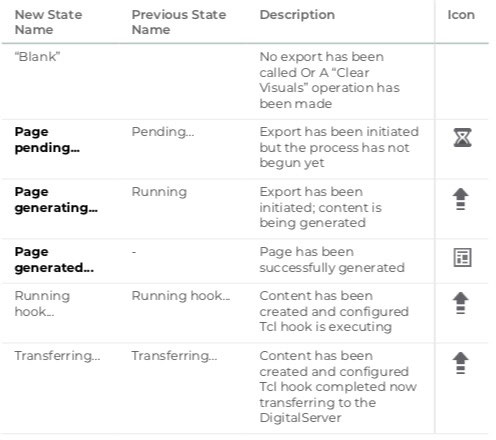
Changes to the Digital Export States
In systems prior to CUE Print 3.18.0, it was, in the user interface, not possible to distinguish between when a page had been generated during the digital export, and when the entire export was completed.
Furthermore, the state “Pending…” indicating that an export has been initiated, but the process has not begun yet, did not have a state icon, which could lead to confusion for the user.
From version CUE Print 3.18.0, a new “Page generated…” state has been introduced. The state is indicated with an icon in the user interface and will be displayed every time a page has been generated during the digital export.
Furthermore, the state indicating pending pages has a new icon, making it easier for you to identify which pages are pending during the digital export process.
Finally, some of the state names have been changed with CUE Print 3.18.0. This means that the pages can have the following states during the digital export process. The new/changed states are marked in bold:
The digital export states can also be displayed the Page Info bar in Planning mode Preview or Progress display
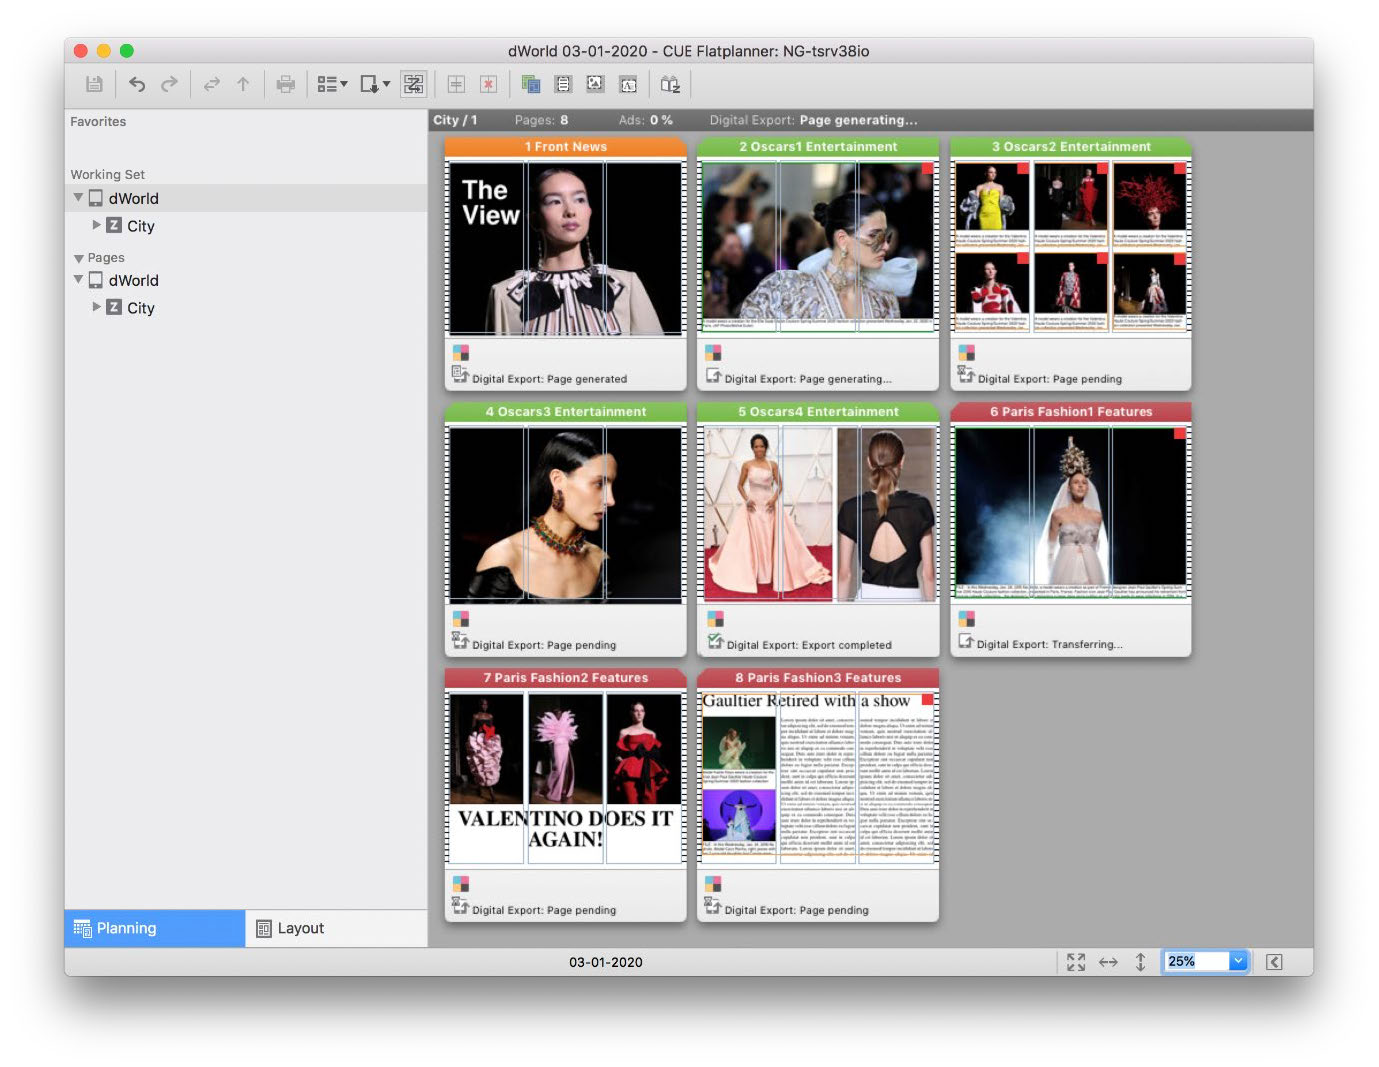
Figure 6. Example of the digital export states in the Page Info bar.
Please note that the settings for displaying the digital export states in CUE Flatplanner are made in Page Info Mode and Page Bars tabs in the Customize Display dialog.
Clickable Ads in Mounted PDFs
Some customers receive digital ad PDFs that have clickable areas with URLs embedded as so- called link annotations. In the PDFs made for digital output in CUE Print, the clickable areas of mounted PDFs should also be represented as link annotations so that the digital readers can use the link information.
From version 3.12.0, if a mounted PDF contains link annotations, all PDFs generated by CCI will contain link annotations inherited from embedded PDFs.
Compacted PDF output in Digital Export
When carrying out a digital export from CCI LayoutChamp or CCI PageDirector, the exported PDF files may have a file size, that cause problems for the Tablet and Mobile applications used for displaying them.
In order to avoid this problem, the PDF files need to be automatically reduced during the digital export. It is therefore, from version 3.10.0, now possible to configure the digital export to carry out post processing with GhostScript. When configured, a digital export from CCI LayoutChamp or CCI PageDirector will automatically invoke this post processing.
How to configure a zone to display single pages
From version 3.11.1, a new configuration option has been added to the “Zone Edition Configuration” object in the Setup workspace.
This option makes it possible to specify if a specific zone should display pages as facing pages or not. When configured, the option will affect the display of pages in CUE Pageturner and page lists thumbnail view in the Pages workspace.
The parameter can have two values or be left out. If the parameter is left out in the XML file, facing pages will be displayed in in CUE Pageturner, and in page list with thumbnail view in the Pages workspace.:
VALUE DESCRIPTION DEFAULT
0
1X Left out Facing pages are displayed X
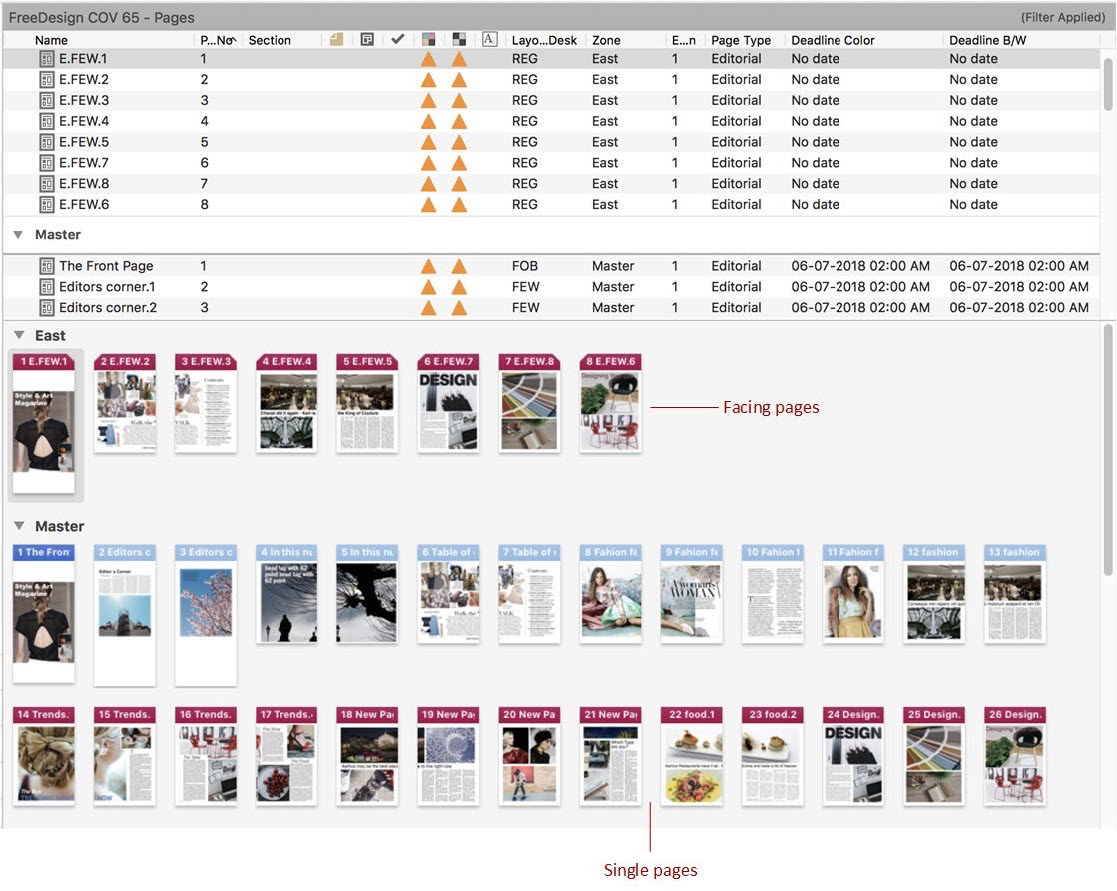
Figure 74. Example of a page list with thumbnails displaying facing pages for the “East” zone and single pages for the “Master” zone.
Swatches Available in CCI ModelEdit
CCI ModelEdit & CUE Designer
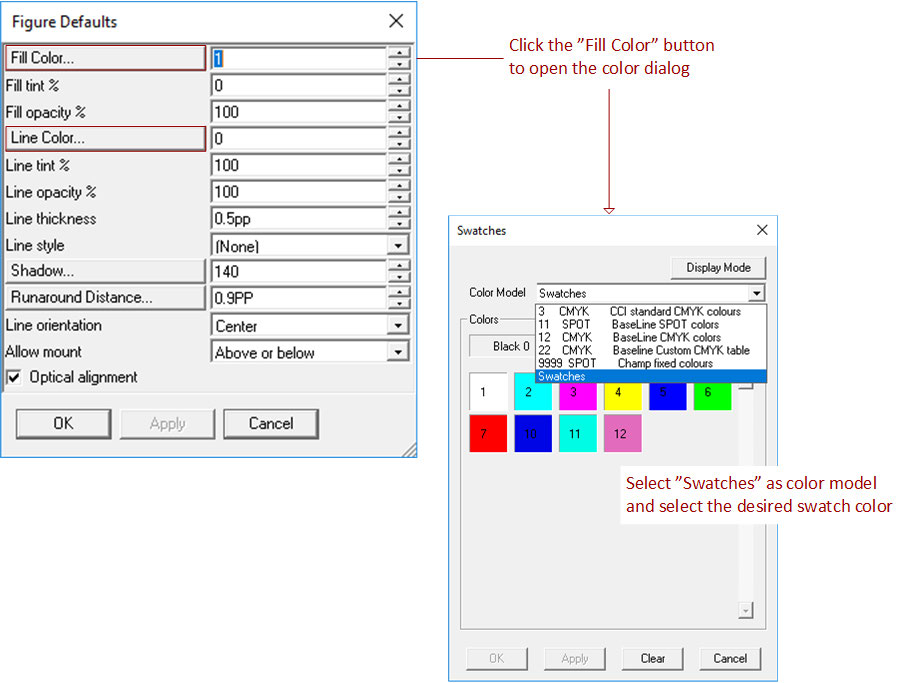
From version 3.12.0, “Swatches” has been included as available color model in the color dialogs in CCI ModelEdit. This means that you now can select a default swatch color in the color options anywhere in CCI ModelEdit, where you can set a default color.
The following example shows the swatch color option in the “Figure Defaults” dialog:
Please note that the following swatches are not available:
• Paper swatch
• Tint swatches
• RGB
• Deleted swatches
Where to find more information about swatches and page color defaults
When you use swatches from CCI ModelEdit it is important to make sure that the product you work in has a swatch list, and that the swatch color you refer to is defined in the system.
For more information, about how to create and maintain swatches in the CUE Print system, please refer to the following sections in the “CCI LayoutChamp 3.4.1 – User Interface Overview” document found on http://customer.ccieurope.com/documentation/release- notes/cci-newsgate.aspx:
• Swatches palette – p. 29-33
• More About Swatches – p.92-96
For more information, about how to define and work with page colors in CCI ModelEdit and CUE Designer, refer to the following sections in the “Release Notes – Version 3.5.0” document on http://customer.ccieurope.com/documentation/release-notes/cci-newsgate.aspx:
• Page Color – p. 64-75
• Defining a Default Page Color – p. 87-90
And section 5.9 – “Page Color Default” in the “CCI ModelEdit (UM-2013)” user manual found on http://customer.ccieurope.com/documentation/cci-documentation/cci-newsgate.aspx
Renaming of “Create Database” action
From version CUE Print 3.17.0, the CUE Print Lists – Print action Create Database has been renamed to Adjust settings in CUE Print, as this name better reflects the functionality of the action.
The Adjust settings in CUE Print action must be executed, each time a patch or a new CUE Print version is installed.
Digital Workflow
Defining Zone Specific Digital Distribution Servers
CCIET- 18397
Export of pages from CUE Print to the CCI Distribution Server is done by selecting the relevant zone(s) in CUE Flatplanner and applying the File menu ⇒ Digital Export ⇒ Export option. The pages from the zone(s) can consequently be viewed on the preferred device.
Defining the name of the distribution server(s) and the widget server
The digital export requires that the CCI Distribution servers and Widget server are defined in the CCI ConfigurationManager. You can add multiple distribution servers, but only one widget server.
The distribution servers are defined in the CCI ConfigurationManager parameter:
Configuration of PDF Resolution in Exports
CCI System
In systems prior to version 3.11.0, the ArchiveSpooler configuration for the image resolution was applied to both images and PDFs. This meant that when the ArchiveSpooler generated a PDF file of a page that had a PDF element mounted, it was not possible to keep the PDF element as PDF and at the same time downscale images.
If the resolution was set to “HighRes”, the PDF element and the images were HighRes. And if the resolution was set to “Lowres” (or DPI), the PDF Elements was converted to an image in the requested resolution.
From version 3.11.0, you can, in the configurations for the ArchiveSpooler, ArchiveExport and EPaperExport, now setup the resolution for PDF elements mounted on pages and image separately in a new “PDF Setups” parameter set.
When the ArchiveSpooler, ArchiveExport and EPaperExport generate a PDF files of a page with mounted PDF elements, you have the possibility to keep the PDF elements as PDF, or downscale them as bitmap images. This means that the resulting PDF files of the page contains PDF elements generated according to the settings made in “PDF Setups” value.
The configuration is made in the following CCI ConfigurationManager parameters:
CciApps.ArchiveSpooler.PDFSetups
CciApps.ArchiveExport.PDFSetups
CciApps.EPaperExport.PDFSetups
You define the resolution to the PDF elements in the PDF Element Resolution” setting, where the selectable values are:
Open assignments from a context menu
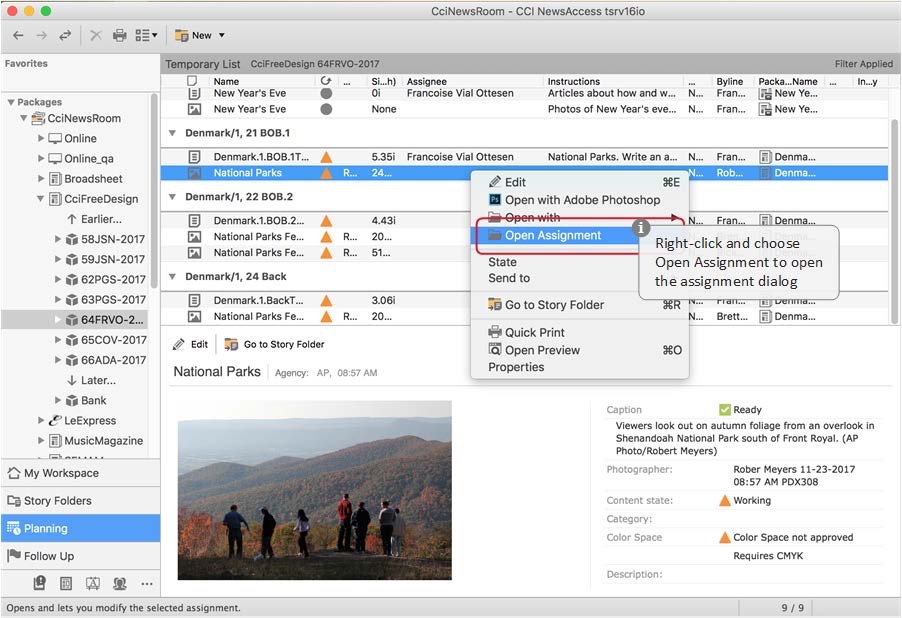 Figure 27. Assignments can now be opened from the context menu.
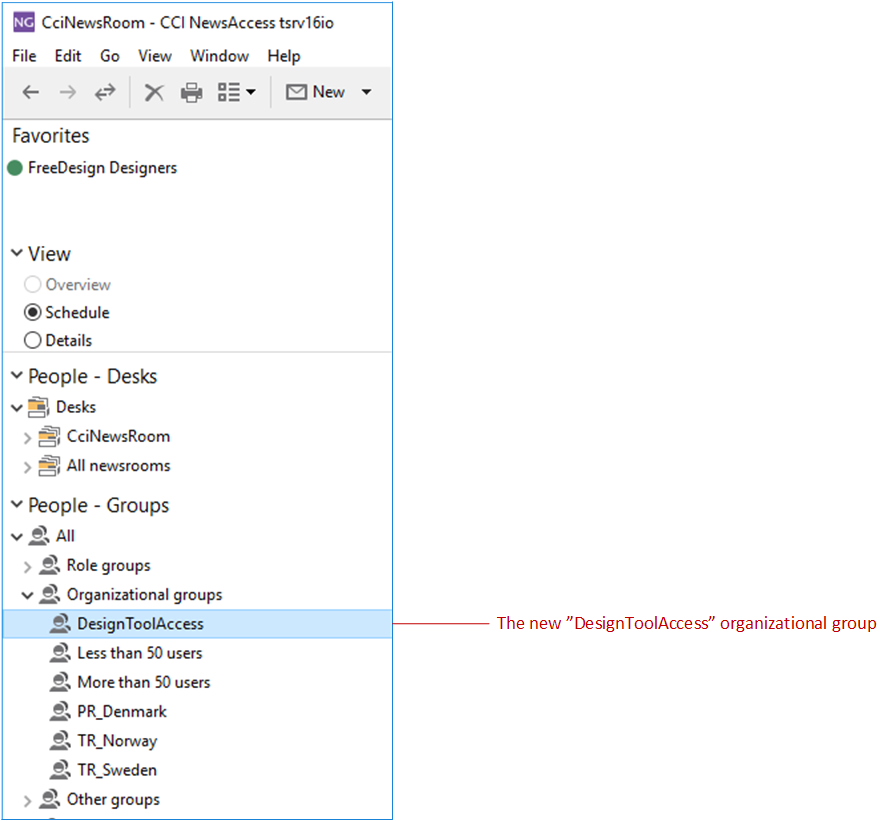
Preventing Access to Page Layout Applications for Non-designers
A new organizational group (DesignToolAccess) will be created when running CreateDB.
As a default everyone is a member of the group.
Menu options to opne pages will not be available in CCI NewsAccess, or CCI NewsAccess if the user is not a member of the “DesignToolAccess” group. The “DesignToolAccess” group is shown below Organizational groups in the People workspace.
Optional Down Sampling and Sharpening in Print Output p.152
From version 3.10.1, it is possible to down sample images in output PDF-files to reduce the size of the PDF. Furthermore, the setup of conversion in Typeset or RIP and used output ICC- profiles has been moved from CCI ModelEdit to the “PrintOutput” configuration Object
When an ImageResolution is setup in the “PrintOutput” configuration, the images in the Output PDF will scaled accordantly. The image will never be up-scaled if resolution is higher than the image. It is configurable which type of images this is applied to.
2.12 Digital Publishing
Sending PDF files to External Processing
CCI NewsAccess & CCI System
From version 3.10.1, the digital export initialized from the CCI LayoutChamp or CCI PageDirector File menu → Digital Export, may now be customized to preprocess the PDF components before they are exported.
The customization is done by providing a Tcl script, which may make use of a third-party product, e.g. Asura.
When you make a digital export in CCI LayoutChamp or CCI PageDirector, the following happens:
• The system runs through the mounted components on the page
• If the component is a PDF component, and the customization has been set up:
• The PDF component is passed to the script
• The script attempts to produce a modified version of the PDF component
• The original PDF component is swapped with the modified version
The PDF component is inserted into the target PDF
Forced Exit of Sub-WSManager if Logout from Web Server has Failed
In systems prior to version 3.10.0, when a logout request from the CCI NewsGate web server failed because of a non-responsive application service, this lead to sub WSManagers that held locks, that could not easily be cleared.
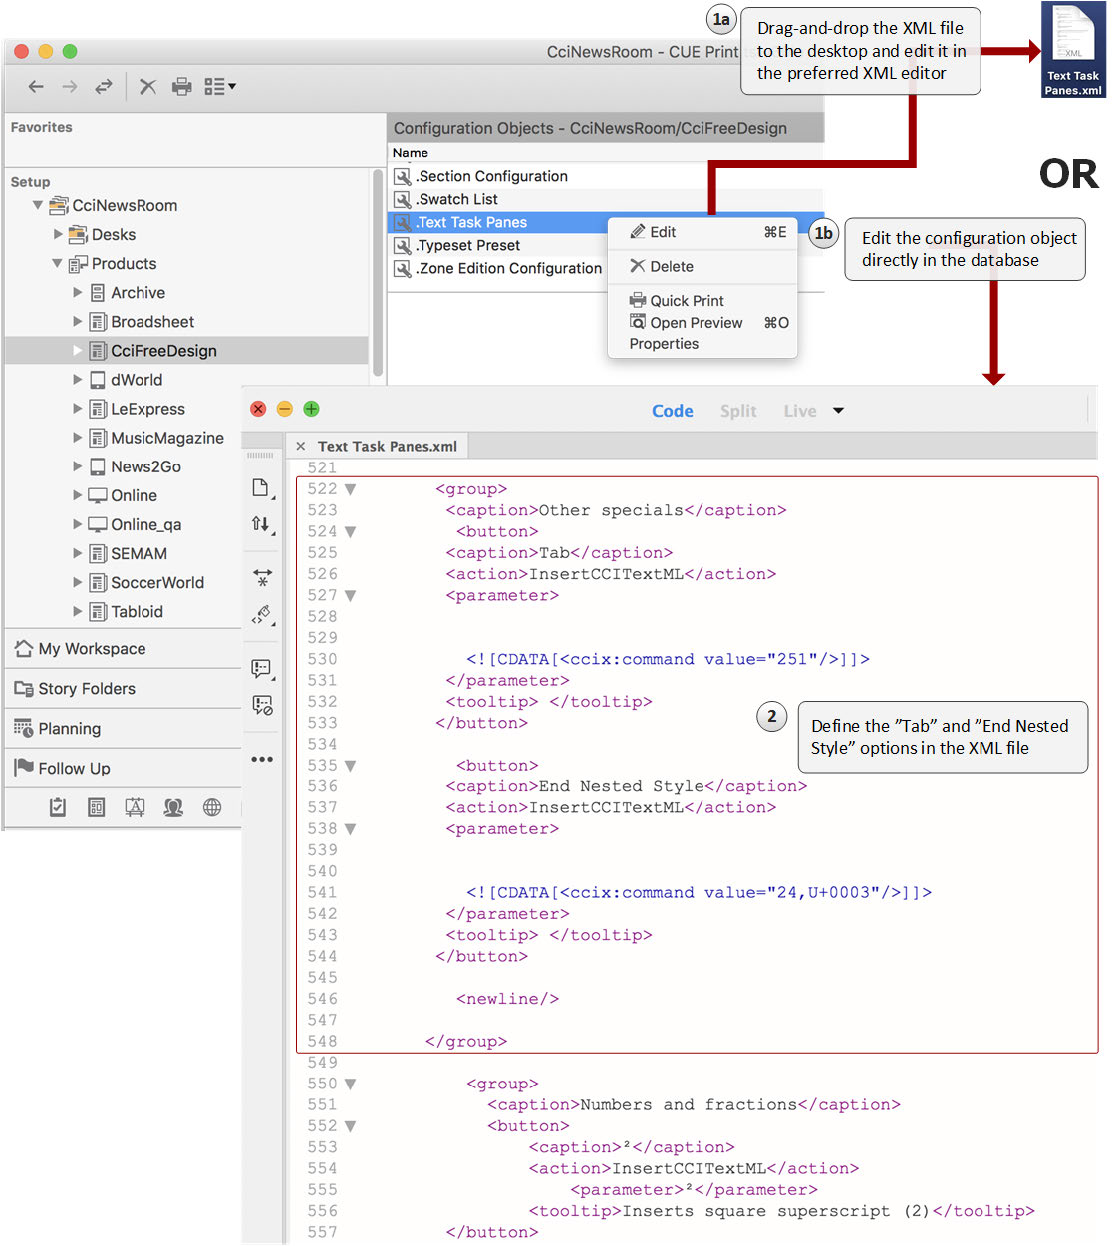
Figure 3. Editing the “Text Task Pane” configuration object to make it possible to insert the “Tab” and “End Nested Style Here” special characters.
Displaying Single or Facing Pages
CUE Print & CUE Pageturner
From version 3.11.1, you can, for each zone, decide whether you want to display single or facing pages in CUE Pageturner, in CUE Flatplanner and in page lists with thumbnail view in the Pages workspace and.
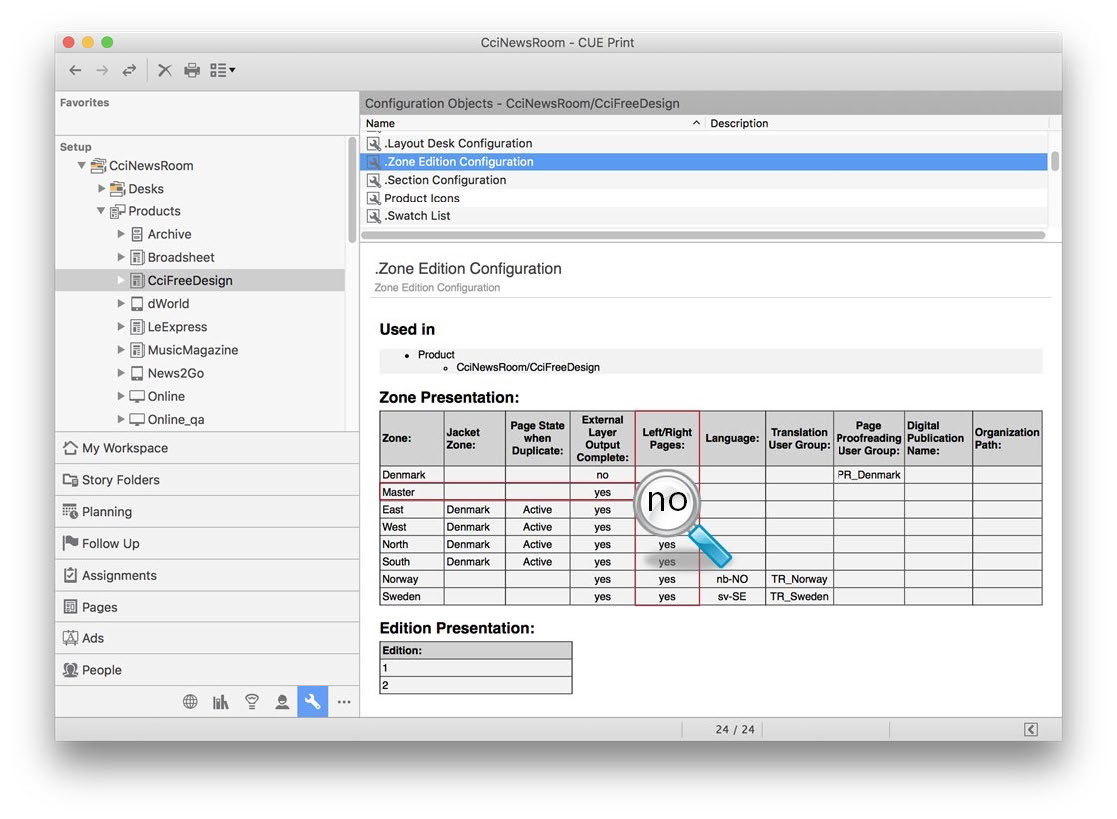
Figure 26. The modified “Zone Edition Configuration” object.
The settings will now cause pages in the “Master” and “West” zones to be displayed as single
pages, and pages in the “East” zone be displayed as facing pages:
Figure 74. Example of a page list with thumbnails displaying facing pages for the “East” zone and single pages for the “Master” zone.
How to configure a zone to display single pages
From version 3.11.1, a new <LeftRightPageView> configuration option has been added to the “Zone Edition Configuration” object in the Setup workspace.
This option makes it possible to specify if a specific zone should display pages as facing pages or not. When configured, the option will affect the display of pages in CUE Pageturner and page lists thumbnail view in the Pages workspace.
The <LeftRightPageView> parameter can have two values or be left out. If the parameter is left out in the XML file, facing pages will be displayed in in CUE Pageturner, and in page list with thumbnail view in the Pages workspace.:
VALUE DESCRIPTION DEFAULT
0
1X Left out Facing pages are displayed X
Example of the “Zone Edition Configuration” object xml file, where pages in the “Master” zone should be displayed as single pages:
<?xml version="1.0" encoding="UTF-8" standalone="no" ?>
<ZoneEditionPres>
  <ZonePres>
    <Name>Denmark</Name>
   <PageProofreading>
     <UserGroup>PR_Denmark</UserGroup>
 </PageProofreading>
    <ExternalLayerOutputNoAds>1</ExternalLayerOutputNoAds>
</ZonePres>
<ZonePres>
<Name>Master</Name> <ExternalLayerOutputNoAds>0</ExternalLayerOutputNoAds> <LeftRightPageView>0</LeftRightPageView>
</ZonePres>
  <ZonePres>
    <Name>North</Name>
<JacketZoneName>Denmark</JacketZoneName>
   <PageSubTypeAtCopy>0</PageSubTypeAtCopy>
  </ZonePres>
</ZonePres>
   <EditionPres>
        <Name>1</Name>
  </EditionPres>
</ZoneEditionPres>
Editing the “Zone Edition Configuration” object
The “Zone Edition Configuration” configuration object can be edited directly in the database by means of the “Edit” action, or by dragging-and-dropping the object to the desktop, from where you can edit it before dragging-and-dropping it back into the Setup workspace.